Announcements
-
This handbook jumped from firmware 0.98 to 1.0.3, some things might need updating, but I have made a correction suggestion form
-
For best first time reading of this guide, I'd advise to look for these two buttons in the top right on desktop versions of the site
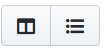 and click the left button to hide the sidebar and read the handbook fullscreen.
 -
I have included a table of contents stickied to the right middle of the page, click it to expand and quickly navigate the guide, and use the up arrow in the bottom right to return to the start of the guide. There is also a collapsed table of contents at the top of the page that can also help you navigate to any section quickly.
-
If you are trying to share a particular section of the guide the easiest way to link to it is
- right click the heading name in the table of contents
- click copy link
- share the link, and jump to sections like the Interchangeable Mounts
-
To join in on the banter you can visit brollbanter.com/matrix . If you're unfamiliar with matrix, it's the same concept as discord but with the open source mentality of Mastadon, and it lets you choose which client you chat on, my space has rooms for Z Cam Discussion and Z Cam Help
-
To support me then use my Ko-Fi if you want me to develop more guides and gear resources and sponsor me on github if you want to focus on open source software development. Both platforms allow one time or recurring donations and the rewards will be as closeley matched as possible once setup.
This handbook was made using my own experiences with my E2 and E2 F8, as well as the collective knowledge of the members of the Z Cam E2 Facebook group, it’s by no means complete but it is a good starting point if you are new to Z Cam. The quick FAQ below addresses most of the questions I see new members ask when joining the Facebook group, after that is a more detailed guide on each of the cameras, features, and software.
Enjoy learning ALL about what your Z Cam can do!
Z Cam Official Resources
Resources on Z Cam’s Github
- Basic Info
- How to Sync E2 Cinema Camera (M/I/S Explained)
- How to sync Timecode on Z Cam E2 Cinema Camera
- Communication Protocols
- 3D Models of Z Cams - E2c - E2 - E2 M4 - E2 S6
Resources on Z Cam’s Website
- E2 Flagship (M4, S6, F6, F8) User Manual up to (firmware 0.98) up to (firmware 0.93)
- E2C User Manual (up to Firmware 0.93)
- E2 User Manual (up to firmware 0.89)
- How to color calibrate a Z Cam - also fixes stuck/dead pixels
Z Cam Firmware Downloads
A note about firmware and software - none of these file downloads are hosted by me, I just reorganized the information found on the Official Z Cam E2 Firmware Updates page. Some download directly from the Z Cam website and the older ones from their google drive.
| E2c | E2G | E2 | M4 | S6 | S6G | F6 | F6-Pro | F8 |
|---|---|---|---|---|---|---|---|---|
| Newest | Newest | Newest | Newest | Newest | Newest | Newest | Newest | Newest |
| 1.0.3 | 1.0.3 | 1.0.3 | 1.0.3 | 1.0.3 | 1.0.3 | |||
| 1.0.1 | 1.0.1 | 1.0.1 | - | 1.0.1 | 1.0.1 | |||
| 1.0.0 | 1.0.0 | 1.0.0 | 1.0.0 | - | 1.0.0 | 1.0.0 | ||
| - | - | - | - | - | - | 0.9.9 | - | |
| - | 0.98.2 | 0.98.2 | - | - | - | - | - | |
| 0.98 | 0.98 | - | - | 0.98.0 | 0.98 | 0.98 | 0.98 | 0.98.0 |
| 0.97.1 | 0.97.1 | - | - | 0.97.1 | - | 0.97.1 | - | 0.97.1 |
| - | - | - | - | - | - | - | 0.97 | - |
| 0.96 | - | 0.96 | 0.96 | 0.96 | - | 0.96 | 0.96 | 0.96 |
| 0.95 | 0.95 | 0.95 | - | 0.95 | - | 0.95 | - | 0.95 |
| 0.94 | 0.94 | 0.94 | - | 0.94 | - | 0.94 | - | 0.94 |
Z Cam Firmware Changelog
Click on any firmware number to see the changes made. Note that some firmware version numbers only apply to one model of camera.
1.0.3
- Added split duration 120 minutes option;
- Added 1s preroll, now 1/3/5/7/10s selectable;
- Support customized frame line png larger than 1920x1080 (7680x4320 max.) pixels;
- Other bug fixes.
1.0.1
- E2-S6 resolution 3456x3456 @50fps, 3840x3840 @30fps, 4000x4000 @30fps
- E2-F6 resolution 4K 4:3 & 4K 6:5 aspect ratios
- E2-F6 crop feature on user programmable button
- EzLink multi camera sync feature
- Lens focal point control (web client)
- Shutter angle 288º
- 0.1º step shutter angle adjustment
- PixelLink multi camera sync bug fixes
- Other bug fixes
1.0.0
-
Added:
- Added BRAW support over HDMI on Blackmagic Video Assist (E2, E2-M4, E2-S6 & E2-F6 only)
Fixed:
- Minor bug fixes
0.9.9
-
F6-Pro Only
-
Added RAW over HDMI (ProRes RAW recording on Atomos Ninja V)
-
Added 4K 4:3 4096x3072 50fps max
-
Optimized Timecode
-
Other bug fixes
-
0.98.2
-
Added:
- 4K 120fps RAW over HDMI
Bug fixes:
- Low jello mode prohibited (RAW over HDMI)
- Minor bug fixes
0.98
-
Added
- All resolution and frame rate combinations now support ProRes 422 recording (except C8K 2.4:1)
- ProRes proxy records in separate files.
- Preview & in camera playback with 3D LUT banding issue fixed.
- External SSD recording through USB performance improved.
- Added 5K 60fps recording on E2-F6.
- UVC (USB camera) bug fixes.
0.97.1
-
Added
- C4K 3:2 aspect ratio (for E2-S6 & E2-F6)
- Extended manual ISO
- Improvements
- ProRes 422 Proxy, 4K up to 120fps (for E2 & E2-M4)
- PProRes HQ, C4K up to 50fps (for E2-S6 & E2-F6)
- ProRes 422, 8K up to 25fps (for E2-F8)
- ProRes LT, 8K up to 30fps (for E2-F8)
- VFR selection moved to Record menu.
- Bug fixes
- ISO setting not memorized.
- pre-roll not working.
0.97
-
E2 & M4
- ProRes 422 Proxy 4k up to 120 FPS
S6 & F6
- C4K 3:2 aspect ratio
- ProRes C4k up to 50fps
F8
- ProRes 422 8k up to 25fps
- ProRes LT 8k up to 30fps
Features and improvements for all cameras
- VFR selection moved to Record menu.
- Finer eND adjustments
- Grip SUBMENU
- Playback speed options 1x, 1/2, 1/4, 1/8
- Noise Reduction for Audio
- Sharpness option "None"
- Image Profiles Vivo 0,1, & 2
- Auto File Recovery
- Extended manual ISO(100-320)
0.96
Features / bug fixes on all models unless otherwise noted
- in camera SRT push (web interface)
- in camera RTMP/RTMPS push (web interface)
- UVC web camera, supports both H.264 & MJPEG
- Concert image profile
- F2 F3 F4 can be assigned for Mode Switching
- RAW over HDMI performance
- [E2-F6][E2-S6] Noise performance further improved in high ISO
- [E2C][E2-F8][E2-S6] White balance 10000K color temperature
- 23.98fps output on HDMI
- Camera preview LUT updated
- Bug Fix: H.264 meta data error
- Bug Fix: Audio gain incorrect
- other bug fixes
0.95
- RAW output over HDMI
- File name display on HDMI when OSD info is ON
- Audio track left / right gain setting adjustment
- Hot Pixel algorithm improved for high ISO
- Noise performance improved for higher frame rates (not applicable to E2C & E2G)
- Maximum ISO refined for Z-Log2
- Programmable eND user button mapping & auto function (flagships only)
- In camera playback Audio video sync issue fixed
- Performance Optimization
- Minor bug fixes
E2 F8
- Noise performance improved for high frame rate & high ISO
E2 F6
- Supports ISO auto
E2 S6
- Added Low jello mode in C5K/5K/C4K/4K/4K 2.4:1
- 2.8K 120fps (2868×1512)
E2 and E2G
- Multicam co-exposure aperture setting
- Multicam master camera AWB push to set
E2G
- Resolution 2880×2160 30fps
- Fixed 23.98 & 50 project fps exposure issue
E2c and E2G
- Added Denoise Off/Weak/Medium setting
- Refined shadow area saturation
0.94
Added
- Low Jello Mode (Z CAM E2 & Z CAM E2-F6).
- De-noise options (off/weak/medium) for Z CAM E2, Z CAM E2-S6, Z CAM E2-F6 & Z CAM E2-F8.
- USB-Serial converter is supported.
- eND is supported.
- HEIF/DNG is supported for still capture.
- PTP is supported.
- Leica DG 45mm (MFT) lens is supported.
Improvements
- Partial debayer ZRAW, compression ratio 8:1, 4K@60fps / 6K@30fps max.
- VFR 4K up to 90fps on Z CAM E2-F6.
- VFR 4K 49~60fps, enhanced FOV on Z CAM E2-F6.
- Refined saturation in shadow (Z CAM E2, Z CAM E2-S6, Z CAM E2-F6 & Z CAM E2-F8)
Software Downloads
| Program / Plugin | Links | When to use |
|---|---|---|
| Z Cam Color Correction Plugin |  |
For making edits to footage in Linear color space. USE THIS PLUGIN ON YOUR NLE of choice if you plan on getting best results from your Z Cam footage. |
| Z RAW Premiere Plugin | |
Enables you to use ZRAW footage directly in Adobe Premiere |
| Z Cam VideoConcatenator | |
For linking long clips separated by the Record Split Duration setting |
| Z Cam VideoTranscoder | |
For extracting the Proxy track (when enabled in camera settings!) and transcoding footage, such as H265 into DNxHD |
| ZRAW Video Suite | |
For working with ZRAW footage, unneeded if you use Premiere on Windows |
| Z Cam Stream Converter | |
For livestreaming over NDI |
| Z Cam Controller | |
I prefer the Web UI controller, since that requires no installs, and works on any OS |
| Z Cam Android App | Settings control, preview, and ability to add the phone's camera to your SSP stream |
Frequently Asked Questions
How to Upgrade Firmware On Z CAMs
Note it is NOT possible to rollback to a firmware before 0.95 once you have updated to 0.95 or newer. My handbook only includes 0.94 and newer, since I strongly encourage all users to be on the most up to date firmware for best performance.
My preferred way to connect my Z Cam to my computer is with a USB C cable and connecting to the web browser, since it requires no installs and gives you the same basic features as the desktop application.
-
Connect to 172.18.18.1/www/index.html in your browser.
Be sure your USB mode is set to Network in the Connection Menu in camera.
-
On the webpage you can control the camera or playback. Select Controller.
The latest firmware for each camera is found in the Firmware Downloads section above.
-
Navigate to the Misc Menu, click Upgrade and then select the file you downloaded from Z Cam’s website in the prompt.
If upgrading from a firmware previous to 0.95 then you MUST rename the .fw file extension to .zip The reason for this is that .fw did not exist prior to 0.95 and it is changed going forward to mitigate Mac and Safari from automatically unzipping downloaded .zip files.
Native ISO
The Z Cam E2 and flagships have dual native ISO, while the E2C and E2G only have one native ISO. Here is a chart listing them. If you want to film exclusively in these ISOs, change ISO Control in the Exposure Menu to Native ISO.
| Camera | Low Native ISO | High Native ISO |
|---|---|---|
| F8 & S6 | 400 | 1250 |
| F6 & F6-Pro | 400 | 2500 |
| E2 & M4 WDR Off E2 & M4 WDR on |
500 250 |
2500 1250 |
| E2G & S6G | 1250 | - |
| E2c | 800 | - |
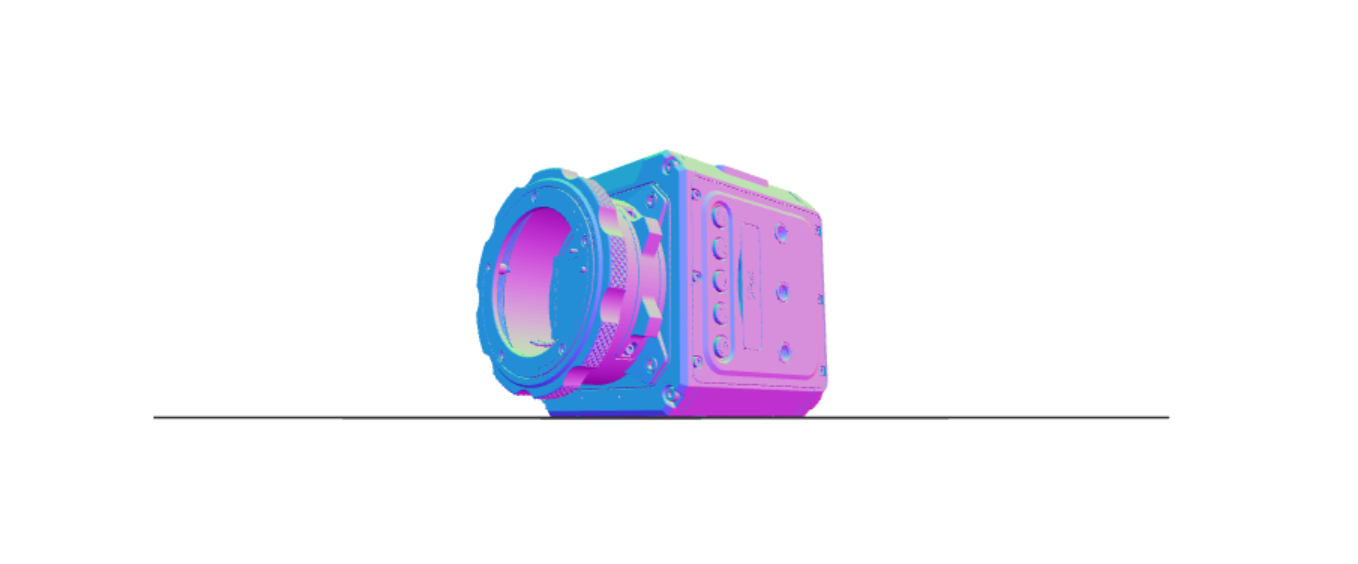
How to Expose for Zlog
- 1st read Jason's Medium Post on the LOG design curve.
- Next, familiarize yourself with the False Color Spectrum of Z CAMs
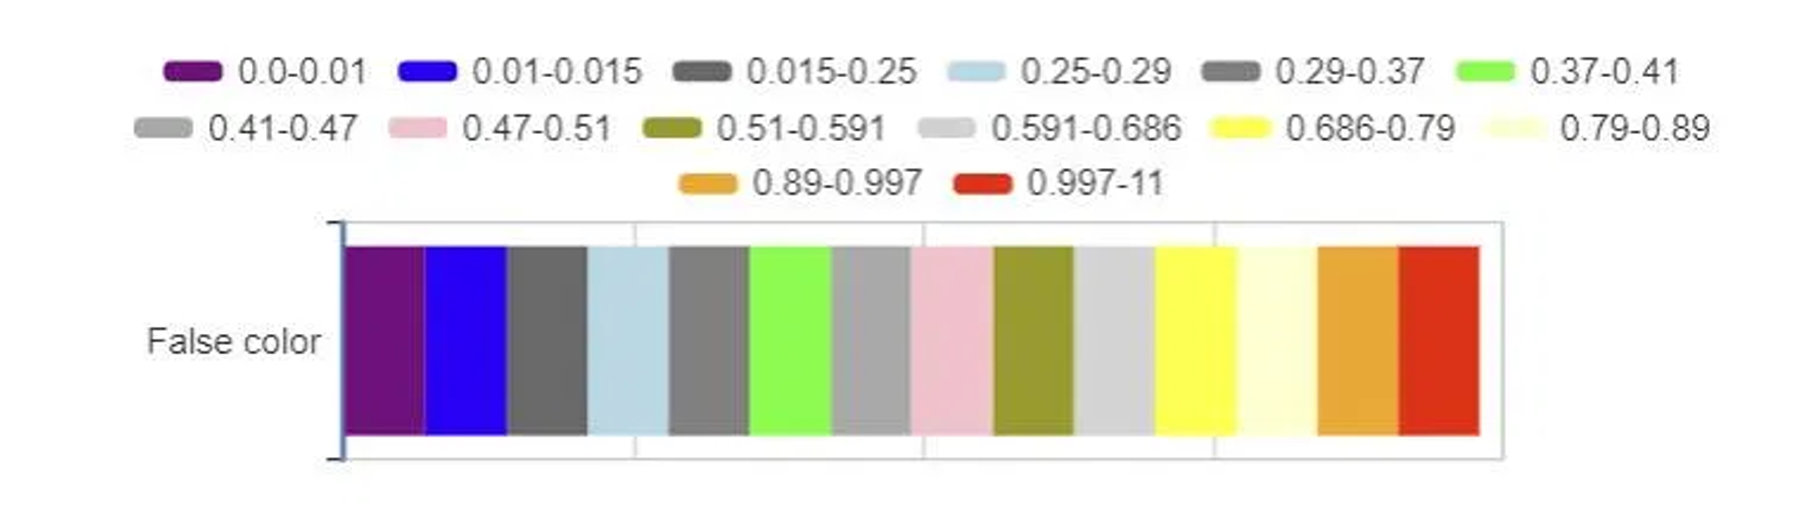
As a general rule you want to make sure your image is free from orange, purple, and blue while in false color mode. The neon green is where you want to aim to get your middle grey exposure, as this leaves 7 stops above to deal with over exposure. All skin tone exposure values in the scene should fall between the neon green and yellow regions.
LUTs for Z Cam
I strongly recommend using LUTs in your monitor or wireless phone Z CAM app.
-
Z CAM's 1st party LUTs are available for download here, however I would recommend using Exigent Film's Rec 709 exposure LUTs for your monitoring LUTs. The only time that the Vlog LUTs should be used is when filming ProRes RAW externally on an Atomos Ninja V.
-
Exigent Films Rec 709 LUTs - and check out the creator's YouTube channel. He also co-designed my favorite top handle which you can get the Nato or 3/8" fullsized or the mini nato or 3/8" versions.
CFast vs SSD & Recommended Brands
For reliability it is always recommended to use a CFast card, but you can also record onto an external USB C SSD. Due to the high constant bitrate write demand here are the top recommendations based on the Facebook group:
I would not recommend using USB C for anything other than H.265. For ProRes 422 and HQ sustained write speed CFast is a must.
RECOMMENDED
-
Angelbird CFast - previously recommended by Z Cam, and my current choice for CFAST
-
Many Z Cam users recommend Exascend and they make a Z Cam certified CFast card, however I have not personally put one to the test in my F8
-
Sandisk SSD - previously recommended by Z Cam, and my choice for SSD
TESTED BUT NOT RECOMMENDED
AVOID
- Sony CFast
- Prograde CFast - works in limited sample size
- Samsung T5 & T7 SSD - there are many reported issues of dropping frames due to the drive's limited sustained write speed. These drives are not meant for media recording according to several distributers' of them, please, please just get something off the recommended list.
- Lexar CFast
- Integral Ultima - too slow for ProRes422HQ
Recording Media Formatting Troubleshooting Steps
- Format on PC using Exfat and set to GUID Partition Table (GPT)
- Turn on camera and make sure Cfast card is not inserted
- After camera boot-up, insert card
- Format in camera
Sample Kits
In Development
- Z Cam E2 M4 – Starter Kit
- Z Cam E2 S6 – Indie Filmmaker Kit
- Z Cam E2 F6 – Do it All Kit
- Z Cam E2 F8 – High Detail Kit
- Z Cam E2 – Lightweight Kit
- Z Cam E2c – Multicamera Livestreaming Setup
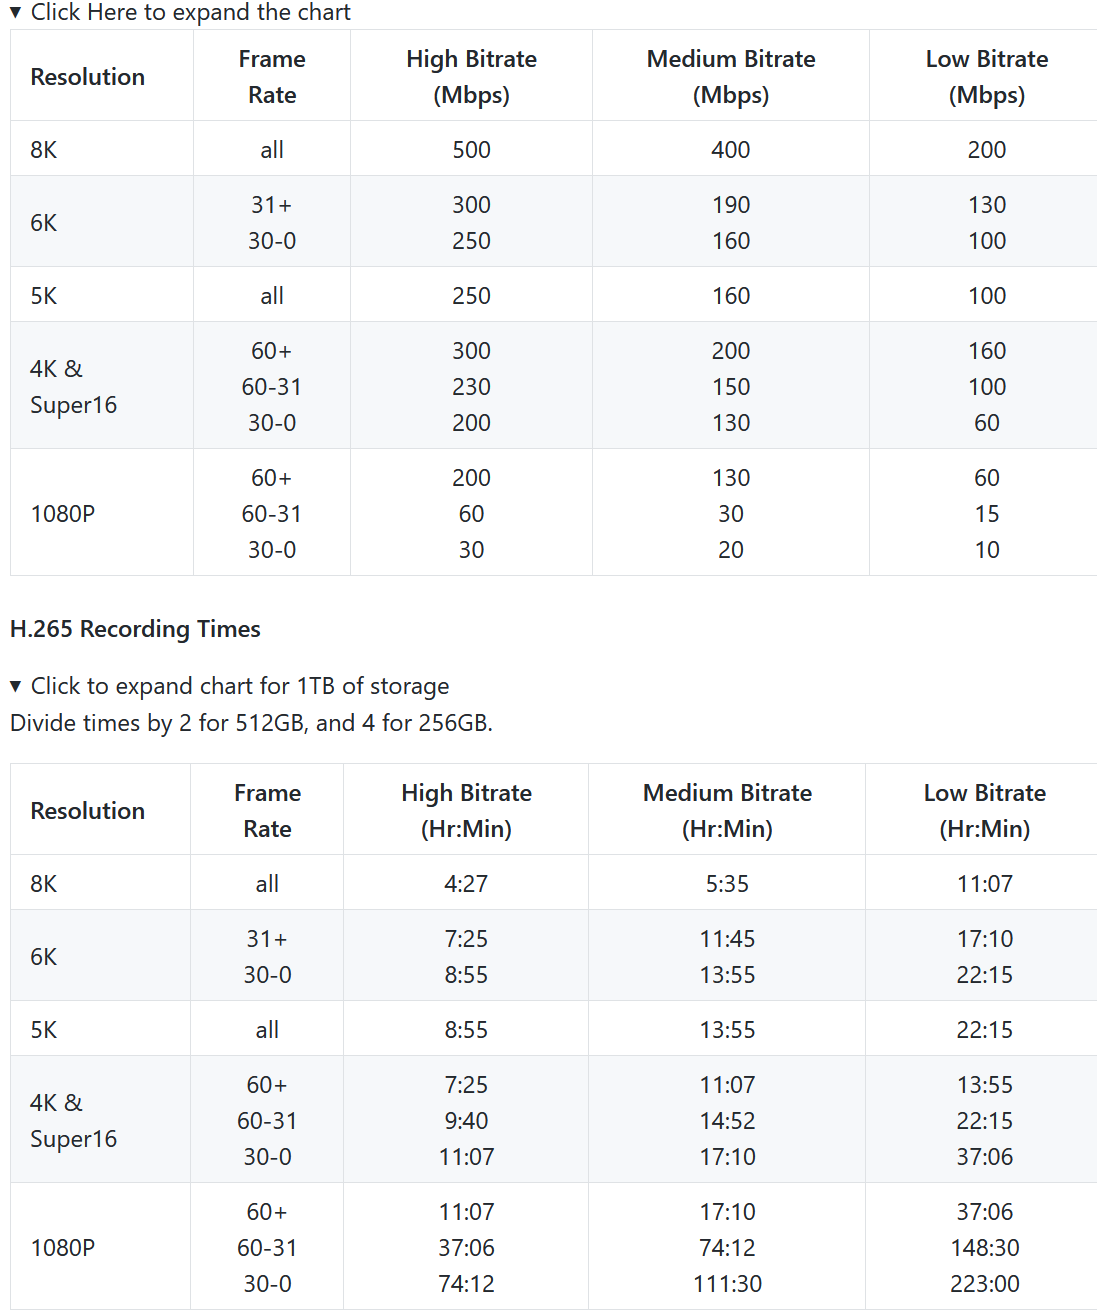
Bitrates and Recording Times
H.265 Bitrates
Click here to download the H.265 reference charts
Click Here to expand the chart
| Resolution | Frame Rate | High Bitrate (Mbps) | Medium Bitrate (Mbps) | Low Bitrate (Mbps) |
|---|---|---|---|---|
| 8K | all | 500 | 400 | 200 |
| 6K | 31+ 30-0 |
300 250 |
190 160 |
130 100 |
| 5K | all | 250 | 160 | 100 |
| 4K & Super16 | 60+ 60-31 30-0 |
300 230 200 |
200 150 130 |
160 100 60 |
| 1080P | 60+ 60-31 30-0 |
200 60 30 |
130 30 20 |
60 15 10 |
H.265 Recording Times
Click to expand chart for 1TB of storage
Divide times by 2 for 512GB, and 4 for 256GB.
| Resolution | Frame Rate | High Bitrate (Hr:Min) | Medium Bitrate (Hr:Min) | Low Bitrate (Hr:Min) |
|---|---|---|---|---|
| 8K | all | 4:27 | 5:35 | 11:07 |
| 6K | 31+ 30-0 |
7:25 8:55 |
11:45 13:55 |
17:10 22:15 |
| 5K | all | 8:55 | 13:55 | 22:15 |
| 4K & Super16 | 60+ 60-31 30-0 |
7:25 9:40 11:07 |
11:07 14:52 17:10 |
13:55 22:15 37:06 |
| 1080P | 60+ 60-31 30-0 |
11:07 37:06 74:12 |
17:10 74:12 111:30 |
37:06 148:30 223:00 |
ProRes Bitrates
Click here to download ProRes reference charts. ProRes bitrates are found from these whitepapers and extrapolated when needed.
Click here to expand the chart
| Resolution | Frame Rate | Proxy (Mbps) | LT (Mbps) | 422 (Mbps) | 422 HQ (Mbps) |
|---|---|---|---|---|---|
| 8k | 30 25 24 |
778 649 622 |
1750 1460 1400 |
2514 2097 2011 |
- - - |
| 6k | 50 30 25 24 |
730 437 365 350 |
1643 985 821 788 |
2359 1414 1180 1131 |
- 2121 1769 1697 |
| 5k | 60 45 30 25 24 |
608 507 304 253 243 |
1367 1140 684 570 547 |
1964 1638 982 819 786 |
- 2210 1473 1229 1178 |
| 4k | 120 75 60 50 30 25 24 |
776 486 388 323 194 162 155 |
1750 1095 875 730 437 365 350 |
2514 1572 1257 1049 629 524 503 |
- - 1886 1573 943 786 754 |
| 1080p | 240 120 60 50 30 25 24 |
364 182 91 76 45 38 36 |
816 408 204 170 102 85 85 |
1168 584 293 245 147 122 117 |
1760 880 440 367 220 184 176 |
ProRes Recording Times
Click to expand chart for 1TB of storage
Divide times by 2 for 512GB, and 4 for 256GB.
| Resolution | Frame Rate | Proxy (Hour:Min) | LT (Hour:Min) | 422 (Hour:Min) | 422 HQ (Hour:Min) |
|---|---|---|---|---|---|
| 8K | – | – | – | – | – |
| 6K | 45 30 25 24 |
– 5:52 7:01 7:19 |
– 2:36 3:07 3:15 |
1:12 1:48 2:10 2:16 |
– – 1:27 1:30 |
| 5K | 30 25 24 |
8:26 10:08 10:33 |
3:45 4:30 4:41 |
2:37 3:08 3:16 |
1:44 2:05 2:10 |
| 4K | 75 60 50 30 25 24 |
5:17 6:36 7:56 13:13 15:49 16:32 |
2:20 2:56 3:30 5:51 7:01 7:19 |
1:38 2:02 2:27 4:05 4:53 5:05 |
1:05 1:22 1:38 2:43 3:16 3:24 |
| 1080P | 120 60 50 30 25 24 |
14:05 28:10 33:44 56:58 67:27 71:12 |
6:17 12:34 15:05 25:08 30:09 30:09 |
4:23 8:45 10:28 17:26 21:00 21:54 |
2:55 5:50 6:49 11:39 13:56 14:34 |
ZRAW Bitrates
ZRAW records in 1.2Gbps, which will fill up 1TB of storage in 2 hours and 5 minutes. 512GB in 1hr 3min, 256GB in 34min.
Z Cam Flagship FPS Charts
Z Cam E2 M4 Max FPS in all Resolutions and Codecs
Click here to download the chart for FW 1.0.3 Click here to suggest an edit and please be as precise as possible with resolution, codec and the fps it allows
Click to expand the chart
| M4 FW 1.0.3 | MP | H.264 | H.265 | ProRes Proxy | ProRes LT | ProRes 422 | ProRes HQ | ZRAW | Est Crop Factor | CF w/ Turbomount |
|---|---|---|---|---|---|---|---|---|---|---|
| 4k 4:3 Low Noise 3696×2772 |
10.2 | 30 | 30 | 30 | 30 | 30 | 30 | 30 | x2.00 | x1.42 |
| C4k Low Noise 4096×2160 |
8.8 | 30 | 30 | 30 | 30 | 30 | 30 | 30 | x2.01 | x1.42 |
| 4k Low Noise 3840×2160 |
8.3 | 30 | 30 | 30 | 30 | 30 | 30 | 30 | x2.09 | x1.49 |
| 4k 4:3 3696×2772 |
10.2 | 60 | 60 | 60 | 60 | 60 | 60 | 60 | x2.00 | x1.42 |
| 4k 6:5 3312×2760 |
9.1 | 60 | 60 | 60 | 60 | 60 | 60 | 60 | x2.13 | 1.52 |
| C4k 4096×2160 |
8.8 | 60 | 120 | 120 | 120 | 120 | 60 | 60 | x2.01 | x1.58 |
| 4K 3840×2160 |
8.3 | 60 | 120 | 120 | 120 | 120 | 60 | 60 | x2.10 | x1.49 |
| C4K 2.4:1 4096×1728 |
7.1 | 60 | 150 | 150 | 150 | 150 | 60 | 60 | x2.08 | x1.48 |
| 4K 2.4:1 3840×1600 |
6.1 | 60 | 160 | 160 | 160 | 160 | 90 | 60 | x2.22 | x1.58 |
| S16 2704×1600 |
3.5 | 60 | 160 | 160 | 160 | 160 | 120 | 60 | x2.94 | x2.09 |
| S16 16:9 2112×1188 |
2.5 | 60 | 170 | 170 | 170 | 170 | 120 | 60 | x3.81 | x2.71 |
| HD 1920×1080 |
2.1 | 120 | 240 | 240 | 240 | 240 | 240 | – | x2.10 | x2.98 |
Z Cam E2 S6 Max FPS in all Resolutions and Codecs
Click here to download the chart for FW 1.0.3 Click here to suggest an edit and please be as precise as possible with resolution, codec and the fps it allows
Click to expand the chart
| S6 FW 1.0.3 | MP | H.264 | H.265 | ProRes Proxy | ProRes LT | ProRes 422 | ProRes HQ | ZRAW | Est. Crop Factor | CF w/ Turbomount |
|---|---|---|---|---|---|---|---|---|---|---|
| Open Gate 6244x4168 |
26 | 30 | 30 | 30 | 30 | 30 | - | 30 | x1.53 | x1.09 |
| 5K 4:3 5552x4164 |
23.1 | 30 | 30 | 30 | 30 | 30 | 25 | 30 | x1.65 | x1.17 |
| 5K 6:5 4992x4160 |
20.8 | 30 | 30 | 30 | 30 | 30 | 30 | 30 | x1.77 | x1.25 |
| C6K 6064x3196 |
19.4 | 48 | 48 | 48 | 48 | 48 | 30 | 30 | x1.67 | x1.19 |
| 6K 5760x3240 |
18.7 | 48 | 48 | 48 | 48 | 48 | 30 | 30 | x1.73 | x1.23 |
| 6K 2.4:1 6064x2560 |
15.5 | 60 | 60 | 60 | 60 | 50 | 30 | 30 | x1.74 | x1.24 |
| C5K 5120x2700 |
13.8 | - | 60 | 60 | 60 | 60 | 45 | 30 | x1.98 | x1.48 |
| 5K 4800x2700 |
13.0 | - | 60 | 60 | 60 | 60 | 45 | 30 | x2.08 | x1.48 |
| C4K 3:2 4096x2732 |
11.2 | 30 | 30 | 30 | 30 | 30 | 30 | 30 | x2.33 | 1.66 |
| C4k Low Noise 4096x2160 |
8.8 | 30 | 30 | 30 | 30 | 30 | 30 | - | x2.47 | x1.76 |
| 4k Low Noise 3840x2160 |
8.3 | 30 | 30 | 30 | 30 | 30 | 30 | - | x2.61 | x1.83 |
| C4k 4096x2160 |
8.8 | 60 | 75 | 75 | 75 | 75 | 60 | - | x2.47 | x1.76 |
| 4K 3840x2160 |
8.3 | 60 | 75 | 75 | 75 | 75 | 60 | - | x2.61 | x1.83 |
| C4K 2.4:1 4096x1728 |
7.1 | 60 | 100 | 100 | 100 | 100 | 60 | - | x2.58 | x1.83 |
| S16 16:9 3392x1908 |
6.5 | 60 | 90 | 90 | 90 | 90 | 90 | 60 | x2.95 | x2.09 |
| 2.8k 2868x1512 |
4.3 | 60 | 120 | 120 | 120 | 120 | 120 | 75 | x3.54 | x2.51 |
| HD 1920x1080 |
2.1 | 120 | 120 | 120 | 120 | 120 | 120 | - | x5.21 | x3.70 |
Z Cam E2 S6G Max FPS in all Resolutions and Codecs
Click here to download the chart for FW 1.0.3 Click here to suggest an edit and please be as precise as possible with resolution, codec and the fps it allows
Click to expand the chart
| S6G FW 1.0.3 | MP | H.264 | H.265 | ProRes Proxy | ProRes LT | ProRes 422 | ProRes HQ | ZRAW | Est. Crop Factor | CF w/ Turbomount |
|---|---|---|---|---|---|---|---|---|---|---|
| Open Gate 6144x4096 |
26 | 30 | 30 | 30 | 30 | 30 | - | 30 | x1.4 | x1.0 |
| C6K 6144x3240 |
19.4 | 30 | 30 | 30 | 30 | 30 | 30 | 30 | x1.48 | x1.05 |
| 6k 5760x3240 |
18.7 | 30 | 30 | 30 | 30 | 30 | 30 | 30 | x1.56 | x1.11 |
| 6K 2.4:1 6144x2592 |
15.5 | 50 | 50 | 50 | 50 | 50 | 50 | - | x1.55 | x1.10 |
| C4K 4096x2160 |
8.8 | 56 | 56 | 56 | 56 | 56 | 56 | - | x1.48 or x2.23 |
x1.05 or x1.59 |
| 4K 3840x2160 |
8.3 | 56 | 56 | 56 | 56 | 56 | 56 | - | x1.56 or x2.35 |
x1.11 or x1.66 |
| C4k 2.4:1 4096x1728 |
7.1 | 60 | 70 | 70 | 70 | 70 | 60 | - | x2.33 | x1.65 |
| HD 1920x1080 |
2.1 | 70 | 70 | 70 | 70 | 70 | 70 | 60 | x1.56 or x4.69 |
x1.11 or x3.33 |
Z Cam E2 F6 Max FPS in all Resolutions and Codecs
Click here to download the chart for FW 1.0.3 Click here to suggest an edit and please be as precise as possible with resolution, codec and the fps it allows
Click to expand the chart
| F6 FW 1.0.3 | MP | H.264 | H.265 | ProRes Proxy | ProRes LT | ProRes 422 | ProRes HQ | ZRAW | Est. Crop Factor | CF w/ Turbomount |
|---|---|---|---|---|---|---|---|---|---|---|
| Open Gate 6064x4040 |
24.5 | 30 | 30 | 30 | 30 | 30 | 25 | 30 | X1.00 | vignetting |
| C6K 6064x3196 |
19.4 | 48 | 48 | 48 | 48 | 48 | 30 | 30 | x1.06 | vignetting |
| 6K 5760x3240 |
18.6 | 48 | 48 | 48 | 48 | 48 | 30 | 30 | x1.10 | vignetting |
| 6K 2.4:1 6064x2560 |
15.5 | 60 | 60 | 60 | 60 | 50 | 30 | 30 | x1.11 | vignetting |
| 5K 4:3 5376x4032 |
21.7 | 30 | 30 | 30 | 30 | 30 | 25 | 30 | x1.08 | vignetting |
| 5K 6:5 4848x4040 |
19.6 | 30 | 30 | 30 | 30 | 30 | 30 | 30 | x1.15 | vignetting |
| C5K 5120x2700 |
13.8 | - | 60 | 60 | 60 | 60 | 45 | 30 | x1.26 | vignetting |
| 5K 4800x2700 |
13.0 | - | 60 | 60 | 60 | 60 | 45 | 30 | x1.32 | vignetting |
| C4K 3:2 4096x2732 |
11.2 | 30 | 30 | 30 | 30 | 30 | 30 | 30 | x1.48 | x1.05 |
| C4k 4096x2160 |
8.8 | 60 | 90 | 90 | 90 | 90 | 60 | 60 | x1.57 | x1.11 |
| 4K 3840x2160 |
8.3 | 60 | 90 | 90 | 90 | 90 | 60 | 60 | x1.65 | x1.17 |
| C4K 2.4:1 4096x1728 |
7.1 | 60 | 120 | 120 | 120 | 120 | 60 | 60 | x1.64 | x1.16 |
| S16 16:9 2112x1188 |
2.5 | 60 | 170 | 170 | 170 | 170 | 120 | 60 | x3.01 | x2.13 |
| HD 1920x1080 |
2.1 | 120 | 120 | 120 | 120 | 120 | 120 | - | x1.65 x3.31 |
x1.17 x2.35 |
Z Cam E2 F6-Pro Max FPS in all Resolutions and Codecs
Click here to download the chart for FW 0.9.9 Click here to suggest an edit and please be as precise as possible with resolution, codec and the fps it allows
Click to expand the chart
| F6-Pro FW 0.9.9 | MP | ProRes Proxy | ProRes LT | ProRes 422 | ProRes HQ | Est. Crop Factor | CF w/ Turbomount |
|---|---|---|---|---|---|---|---|
| Open Gate 6064x4040 |
24.5 | 30 | 30 | 30 | 30 | X1.00 | vignetting |
| C6K 6064x3196 |
19.4 | 48 | 48 | 48 | 48 | x1.06 | vignetting |
| 6K 5760x3240 |
18.6 | 48 | 48 | 48 | 48 | x1.10 | vignetting |
| 6K 2.4:1 6064x2560 |
15.5 | 60 | 60 | 50 | 50 | x1.11 | vignetting |
| 5K 4:3 5376x4032 |
21.7 | 30 | 30 | 30 | 30 | x1.08 | vignetting |
| 5K 6:5 4848x4040 |
19.6 | 30 | 30 | 30 | 30 | x1.15 | vignetting |
| C5K 5120x2700 |
13.8 | 60 | 60 | 60 | 60 | x1.26 | vignetting |
| 5K 4800x2700 |
13.0 | 60 | 60 | 60 | 60 | x1.32 | vignetting |
| C4K 3:2 4096x2732 |
11.2 | 30 | 30 | 30 | 30 | x1.48 | x1.05 |
| C4k 4096x2160 |
8.8 | 90 | 90 | 90 | 90 | x1.57 | x1.11 |
| 4K 3840x2160 |
8.3 | 90 | 90 | 90 | 90 | x1.65 | x1.17 |
| C4K 2.4:1 4096x1728 |
7.1 | 120 | 120 | 120 | 120 | x1.64 | x1.16 |
| S16 16:9 2112x1188 |
2.5 | 170 | 170 | 170 | 170 | x3.01 | x2.13 |
| HD 1920x1080 |
2.1 | 120 | 120 | 120 | 120 | x1.65 x3.31 |
x1.17 x2.35 |
Z Cam E2 F8 Max FPS in all Resolutions and Codecs
Click here to download the chart for FW 1.0.3 Click here to suggest an edit and please be as precise as possible with resolution, codec and the fps it allows
Click to expand the chart
| F8 FW 1.0.3 | MP | H.264 | H.265 | ProRes Proxy | ProRes LT | ProRes 422 | ProRes HQ | ZRAW | Est. Crop Factor | CF w/ Turbomount |
|---|---|---|---|---|---|---|---|---|---|---|
| 8K 7680×4320 |
33.2 | – | 30 | 30 | 30 | 30 | – | 30 | x1.25 | vignetting |
| 8K 2.4:1 8192×3456 |
28.3 | – | 30 | – | – | – | – | 30 | x1.17 | vignetting |
| C6K 6144×3240 |
19.4 | 30 | 30 | 30 | 30 | 30 | 30 | 30 | x1.56 | x1.11 |
| 6K 5760×3240 |
18.7 | 30 | 30 | 30 | 30 | 30 | 30 | 30 | x1.66 | x1.18 |
| 4K 3840×2160 |
8.3 | 60 | 60 | 60 | 60 | 60 | 60 | 60 | x1.25 or x2.49 | N/A or x1.77 |
| S16 3392×1908 |
3.5 | 60 | 60 | 60 | 60 | 60 | 60 | 60 | x2.82 | x2.00 |
Crop Factor Estimates Explained
Facebook user Niko Spettmann made these two graphics to explain F6 supersampling and no supersampling and while not originally made to explain crop factors, is a great visual representation of how your camera's image window will react with different resolutions. The smaller the rectangle, the larger the crop factor, also called the focal length multiplyer. We calculate crop factor by dividing the diagonal of 35mm full frame sensor, which is 43.27mm = √(36mm2 + 24mm2). Since this is calculated based on a diagonal the crop factor can differ on resolutions that share a height or width, but because the diagonal is not the same then a focal length multiplyer will not be. The diagonal image size was obtained from the sensor datasheets and extrapolated or inferred when needed. It was a lot of math but if you see any errors please suggest a correction.
What Sensors Do Z Cam Use
| Camera Model | E2c | E2g | E2 & M4 | S6 | S6G | F6 & F6-Pro | F8 |
|---|---|---|---|---|---|---|---|
| Sensor Datasheets |
Sony IMX159 | Sony IMX344 | Sony IMX299 | Sony IMX571 | unknown | Sony IMX410 | Sony IMX455 |
Micro Four Thirds lenses that cover Z Cam E2 S6 in C6k
A user in the facebook group claimed the following lenses that work with OIS and AF/MF as well as aperture and cover up to C6k. I do not own any of them or an S6, so I cannot test to verify. I only put forward the list as a potential lenses to look at if you are looking for MFT lenses with superior coverage. These lenses do not cover S6 open gate
Panasonic Lenses that cover Z Cam S6 in C6k
- 12mm f/1.4
- 15mm f/1.7
- 25mm f/1.7
- 25mm f/1.4
- 30mm f/2.8 macro
- 42.5mm f/1.7
- 42.5mm f/1.2
- 45mm f/2.8 macro
- 12-35mm f/2.8
- 100-400mm
Olympus Lenses that cover Z Cam S6 in C6k
- 12mm f/2
- 17mm f/1.8
- 17mm f/1.2 PRO
- 25mm f/1.2 PRO
- 45mm f/1.2 PRO (manual focus only)
- 60mm f/2.8 Macro
- 75mm f/1.8
- 300mm f/4
Can Z Cam make any interchangeable mount?
This gets asked about nearly every mount that isn't currently made. The answer Z Cam usually gives is that they have submitted the request on their end, or that they are waiting on the other companies to approve.
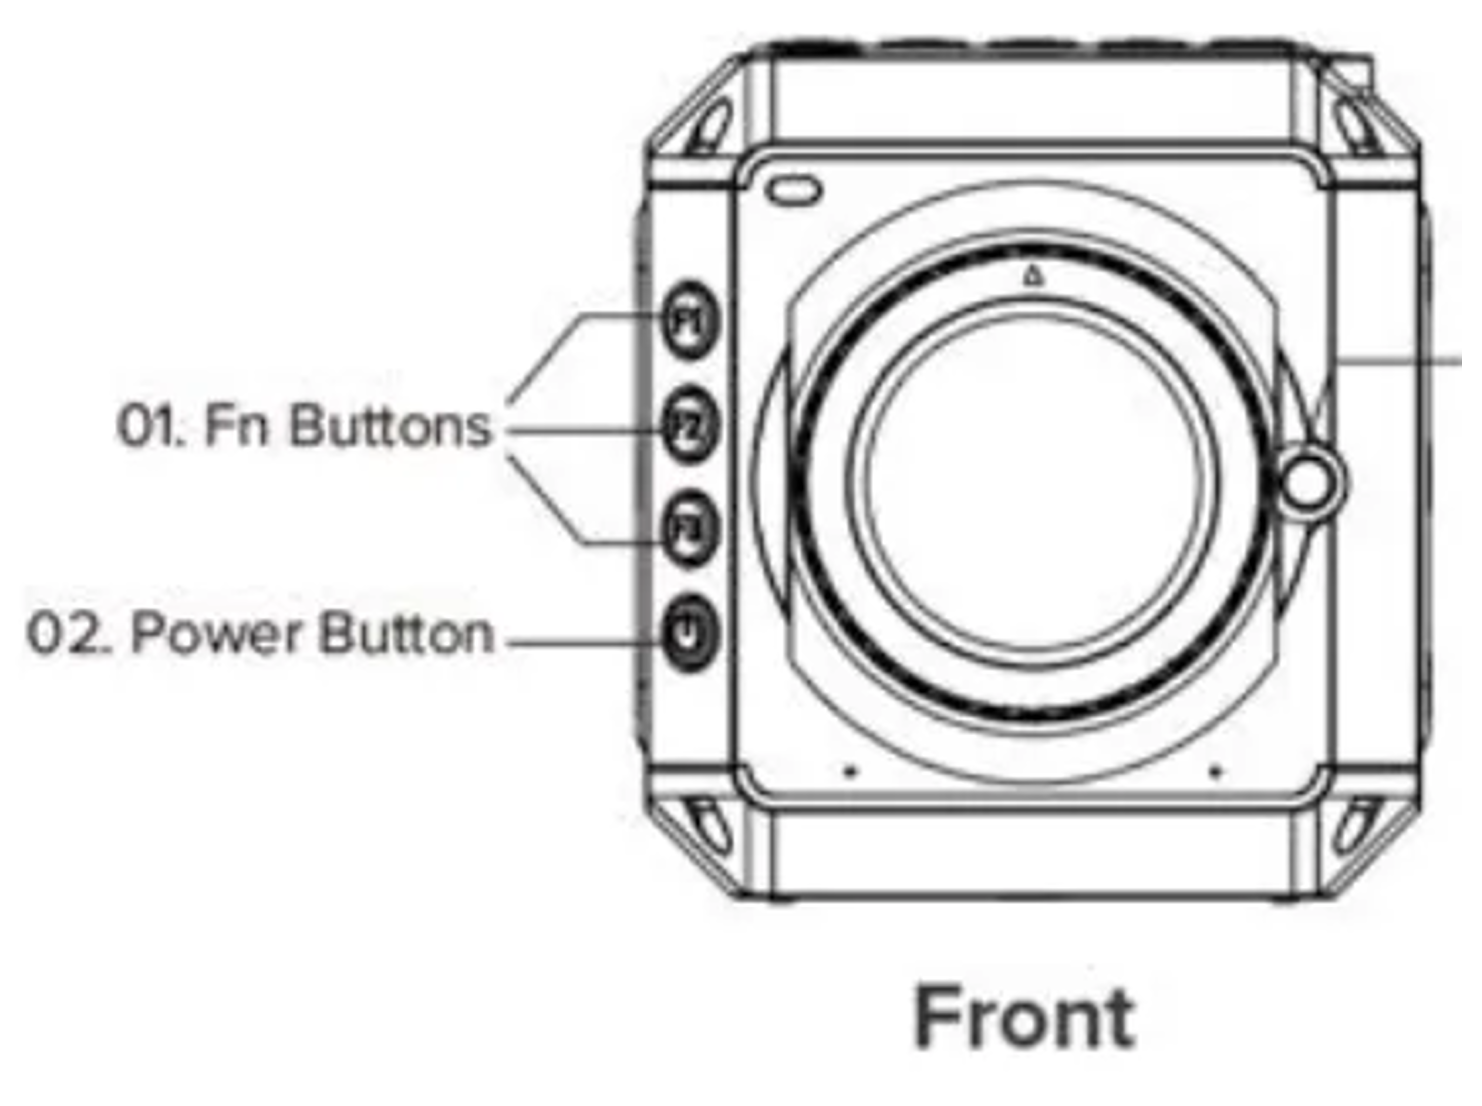
Z Cam Cinema Cameras
Z Cam Flagships
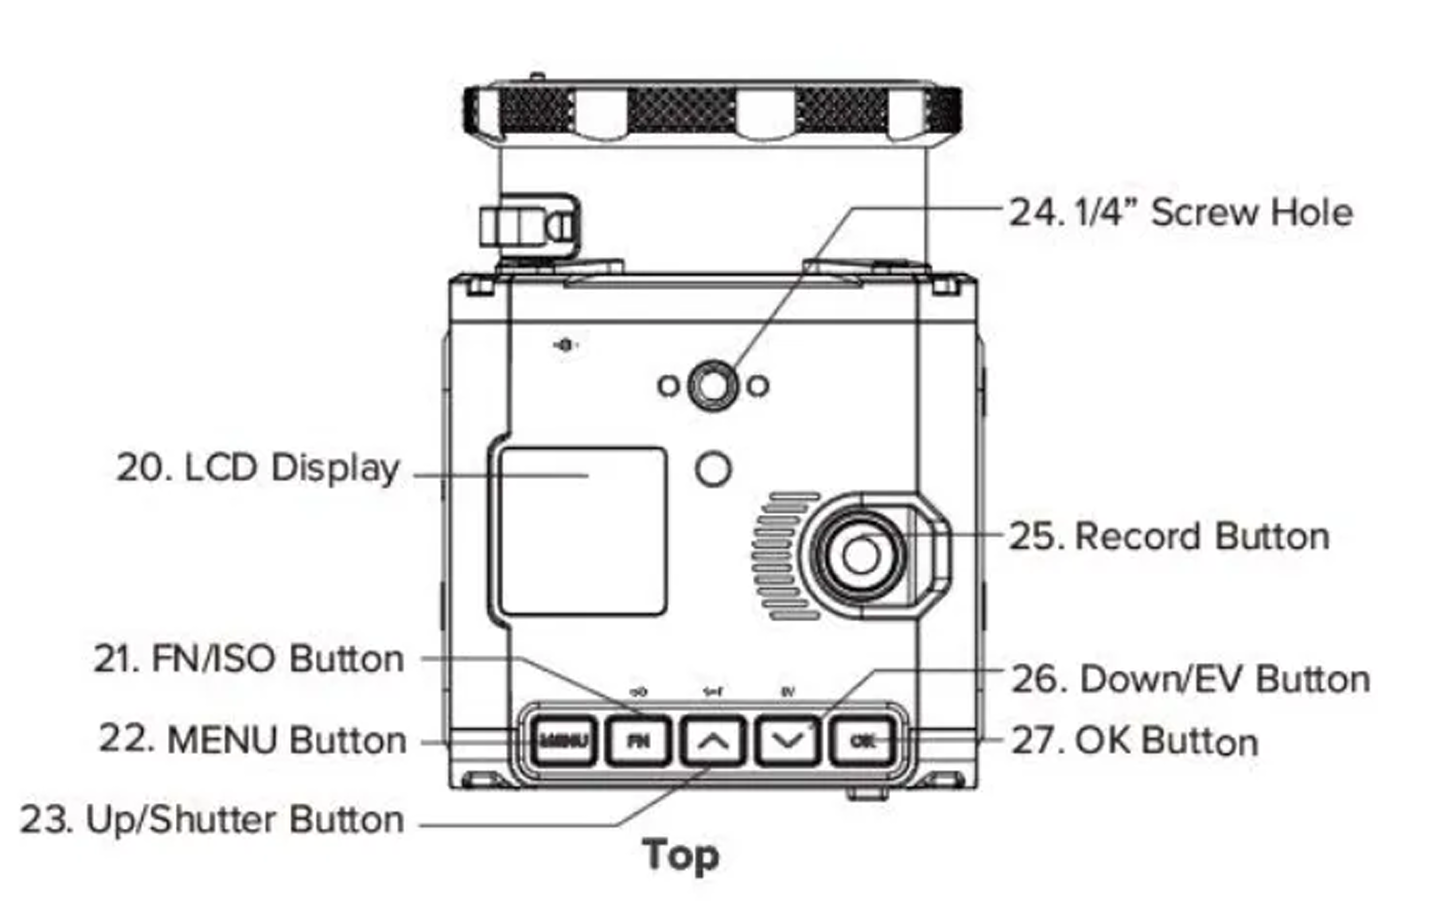
Diagrams of Z Cams come from User Manual v0.4
 |
 |
|---|---|
| 3. Auxiliary Power Output 2 Pin LEMO connector that can supply DC 12V to other devices, such as external monitors |
20. LCD Display press FN + OK when the camera is in standby to turn on video preview |
| 4. Remote Port 2.5mm socket compatible with Sony LANC protocol |
21. FN / ISO Button FN function in camera settings, ISO quick setting in standby, preview, and record modes |
| 5. XLR Audio In 5 Pin LEMO connector for dual XLR input |
22. MENU Button Enter or exit the camera settings, or return to the previous menu while in camera settings |
| 6. Control Port Double serial ports with 4 pin aviation connectors. RS232 protocol is supported |
23. Up / SHT Button Increases value in camera settings. Selects Shutter control when in standby, preview, and record modes |
| 7. Battery Socket NP-F mount with contacts pins reserved for future use. |
24. 1/4″ Screw Hole for top mounting a monitor or securing a cage onto the camera |
| 8. HDMI Port HDMI 2.0 Type A, Max output: C4K 60fps, 10-bit 4:2:2 |
25. 🔴 Record Button Start and stop recording a video |
| 9. Wi-Fi Antenna Port 5GHz signal, supports 802.11 b/g/n standard |
26. Down / EV Button Reduce value in camera settings or quick select EV controls while in standby, preview, and record modes |
| 10. Ethernet Port igabit Ethernet port for connecting to a computer or network switch for live control, streaming, and updates |
27. OK Button Confirmation in camera settings menu. Auto Focus function (with AF lenses) in standby, preview, and recording mode |
| 11. Battery Release Button releases np-f battery lock |
|
| 12. USB C Port USB 3.0 standard. It has 5 options in the menu for what it can do, for an explanation of its functions read this section. |
|
| 13. Power Input 2 Pin LEMO connector that supplies 12V power to the camera. |
 |
 |
|---|---|
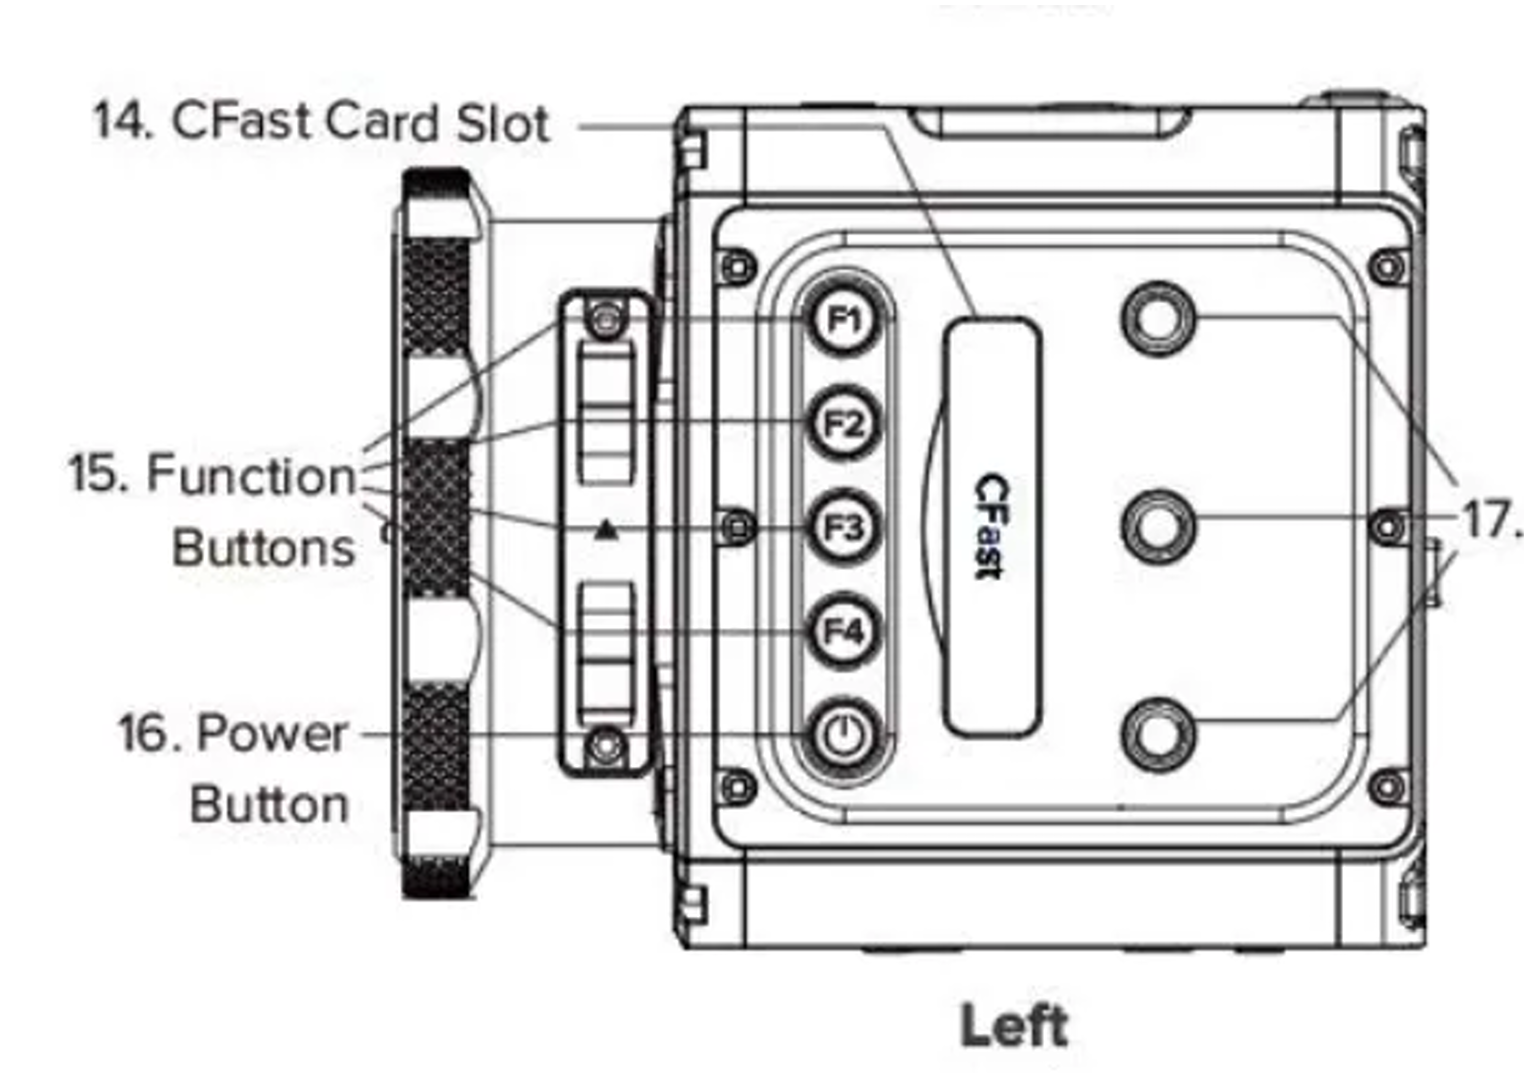
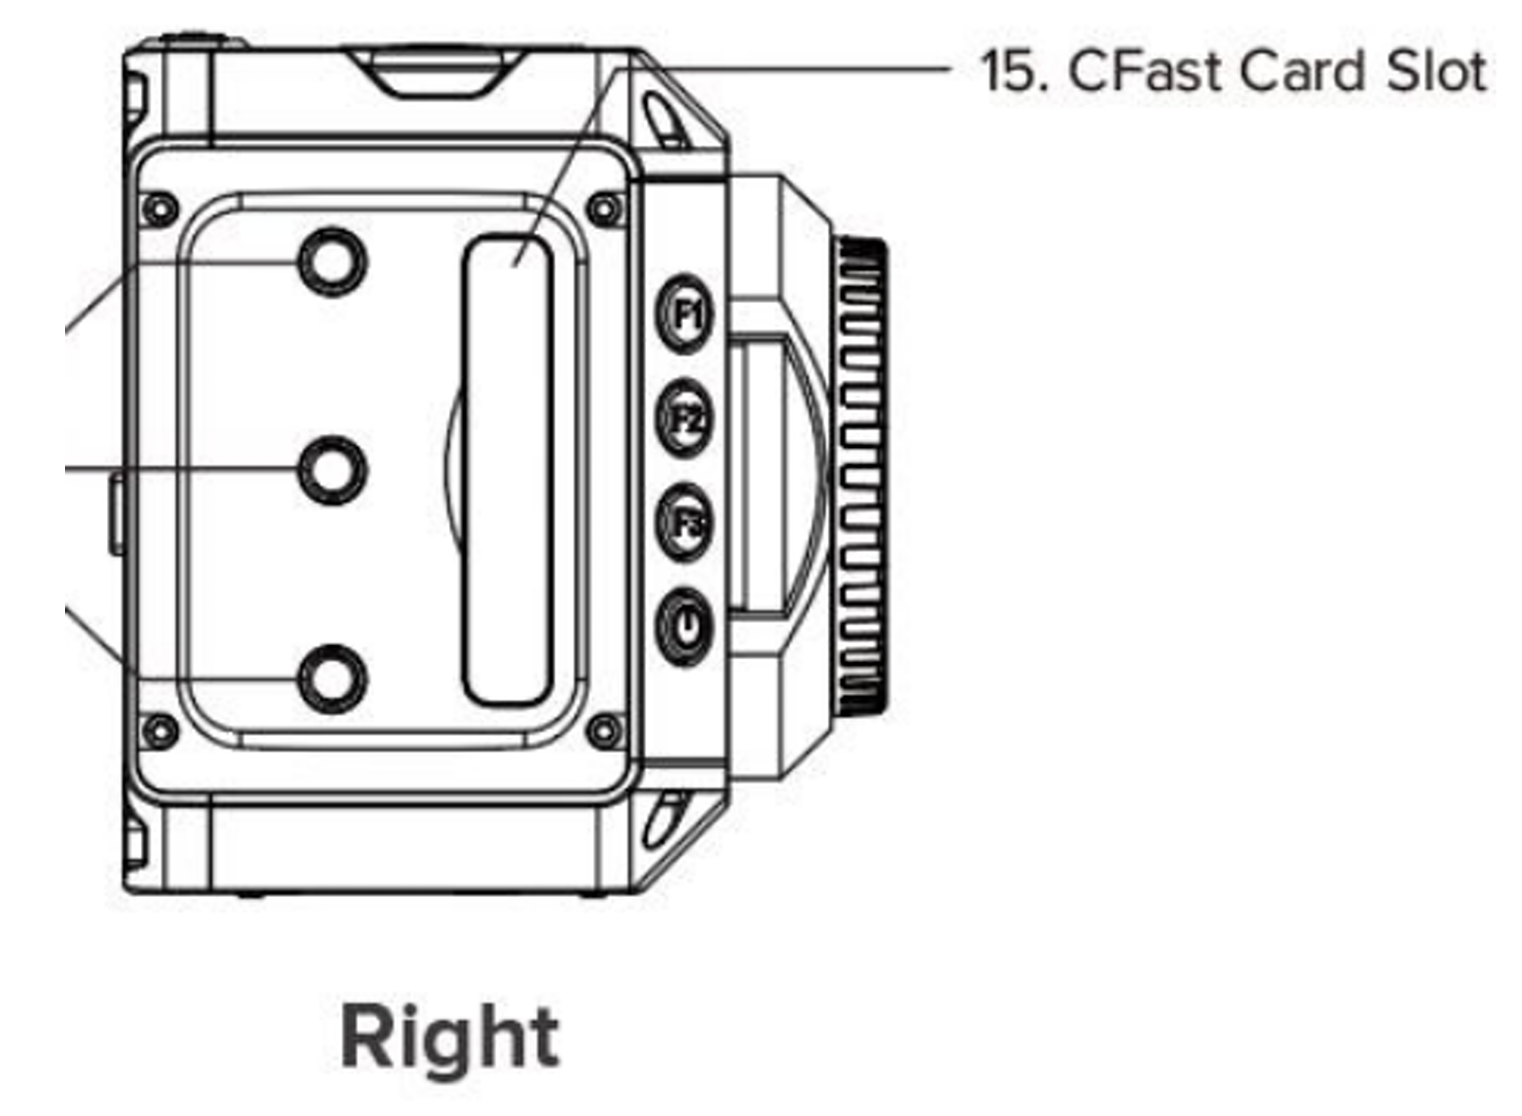
| 14. CFast Card Slot supports CFast 2.0 standard |
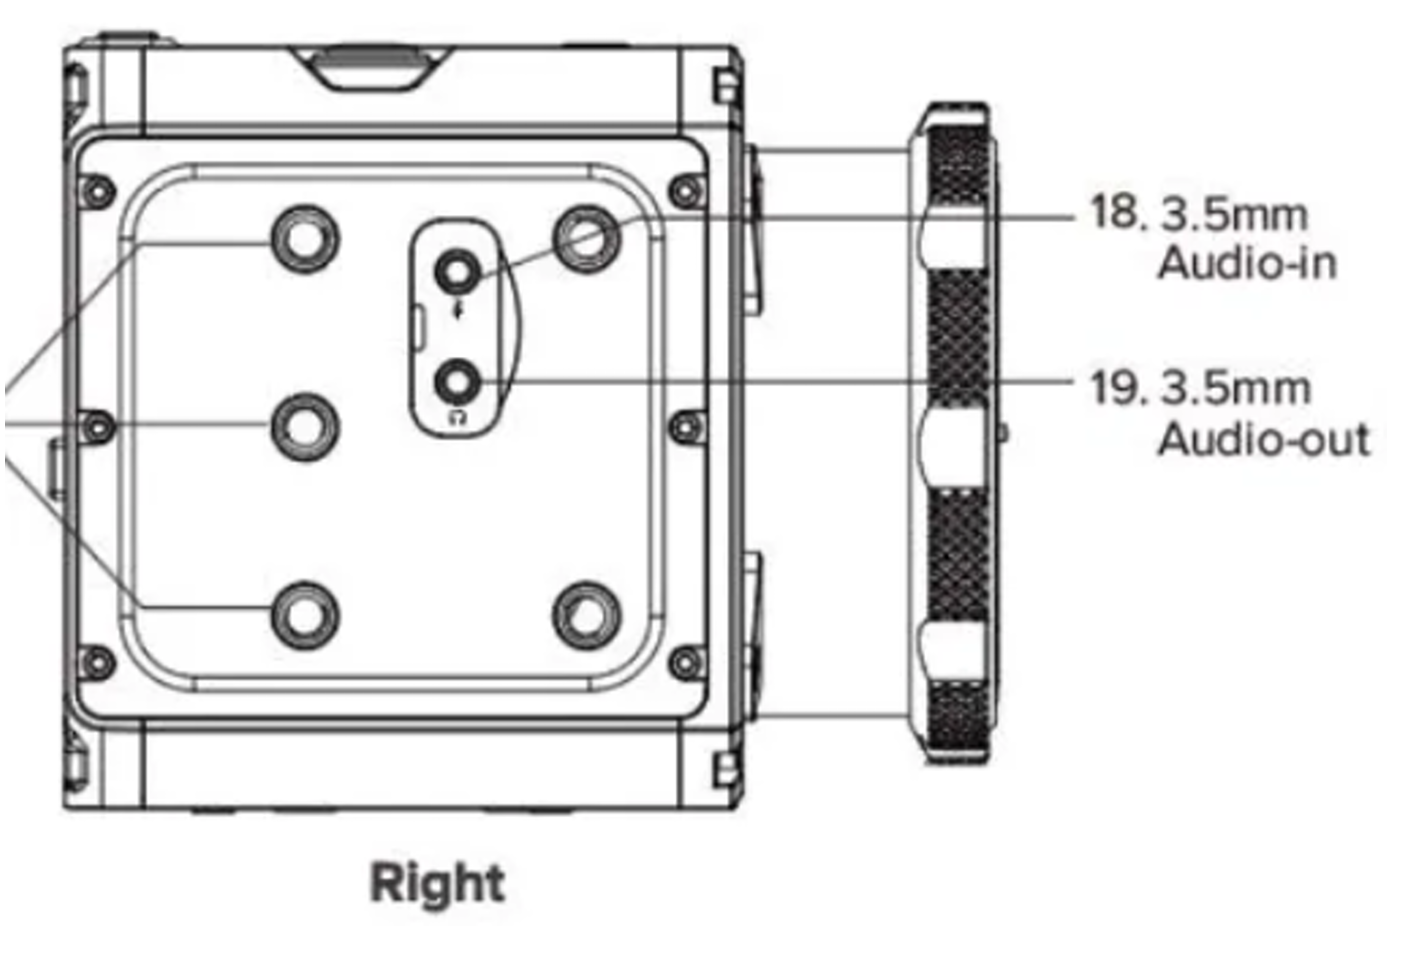
18. 3.5mm Audio In 3.5mm TRS socket for stereo audio input |
| 15. Function Buttons F1 – F4 4 user buttons with custom remapping under user settings |
19. 3.5mm Audio Out 3.5mm TRS socket for stereo audio output |
| 16. Power Button Press Once for playback, hold to power off |
|
| 17. 1/4″ Screw Holes 3 1/4″ screw holes |
Interchangeable Mounts
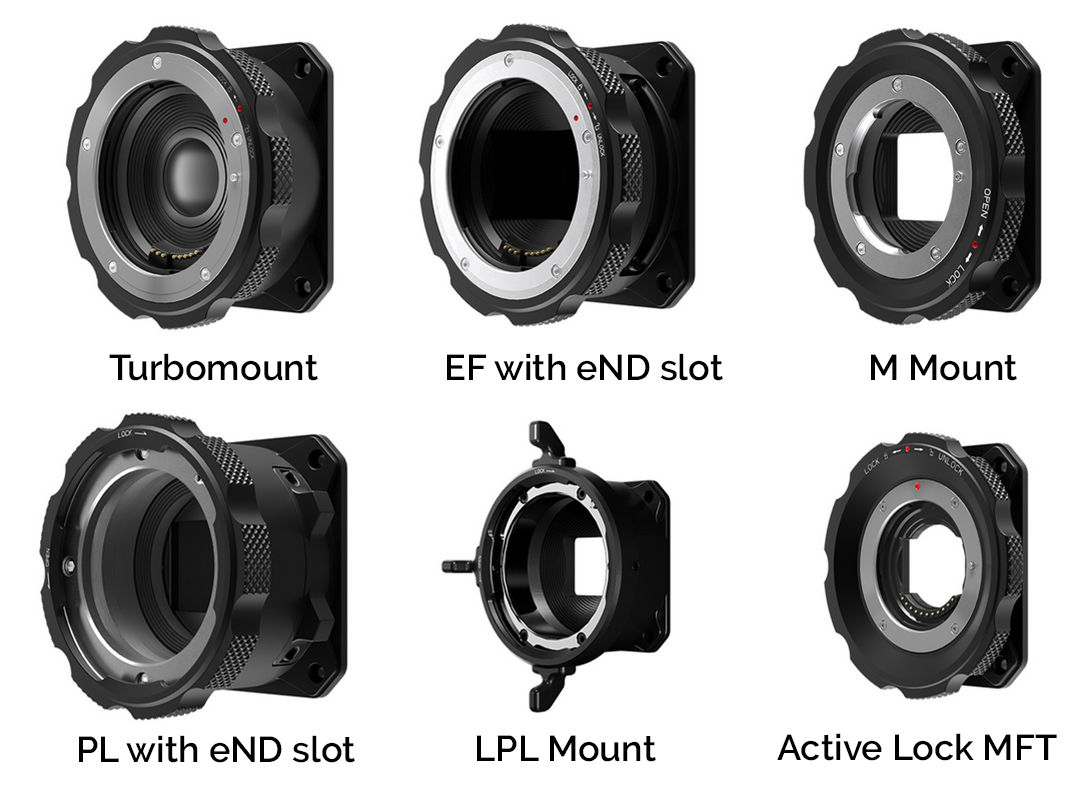
The Z Cam E2 flagships come with the ability to remove and replace the lens mount that comes with the camera, the current options are EF, PL, LPL, M, standard Micro Four Thirds, and Active Lock MFT mounts. In addition, there is an EF speedbooster called the TurboMount with a x0.71 focal reducer built in.
Note that not all mounts are compatible with eND, for now it is limited to the standard EF and PL mounts. Also note the M mount lacks the electronic contact pins that the other mount options have that allow the camera to control the aperture and other lens settings.
When adapting glass it is important to keep in mind Flange focal distance because lenses with longer flange focal distance can be adapted to a larger variety of camera systems.
If you happen to misplace the hex key that came with the interchangeable mount, you can substitute a 2mm hex key.
Other Z Cam Models
Diagrams from E2c fw 0.93 and E2 fw 0.89 user manuals
Z Cam E2 |
Z Cam E2C |
|---|---|
 |
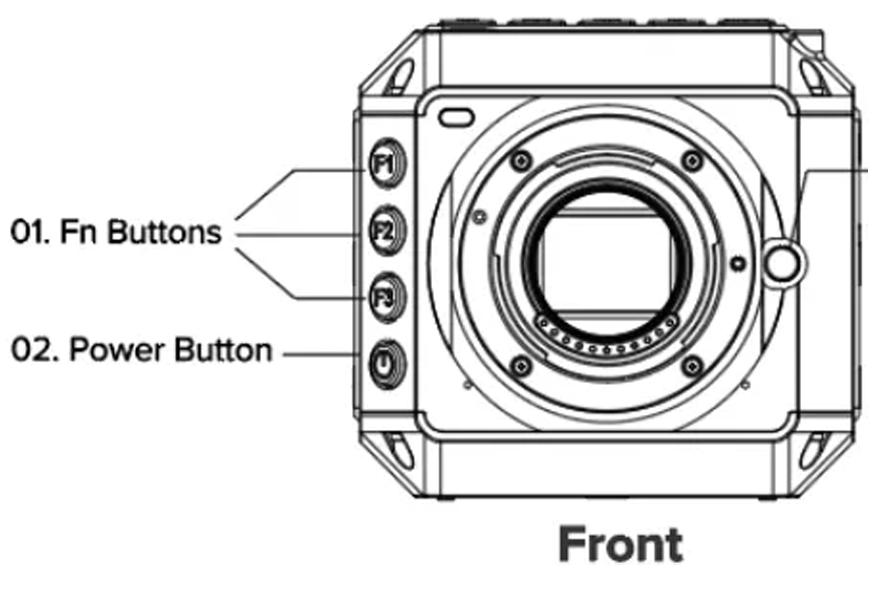 |
| 1. Fn Buttons – F1 – F3 | 1. Fn Buttons – F1 – F3 |
| 2. Power Button Press for 3 second to power on or off the camera, short press to switch to playback mode. |
2. Power Button Press for 3 second to power on or off the camera, short press to switch to playback mode. |
 |
 |
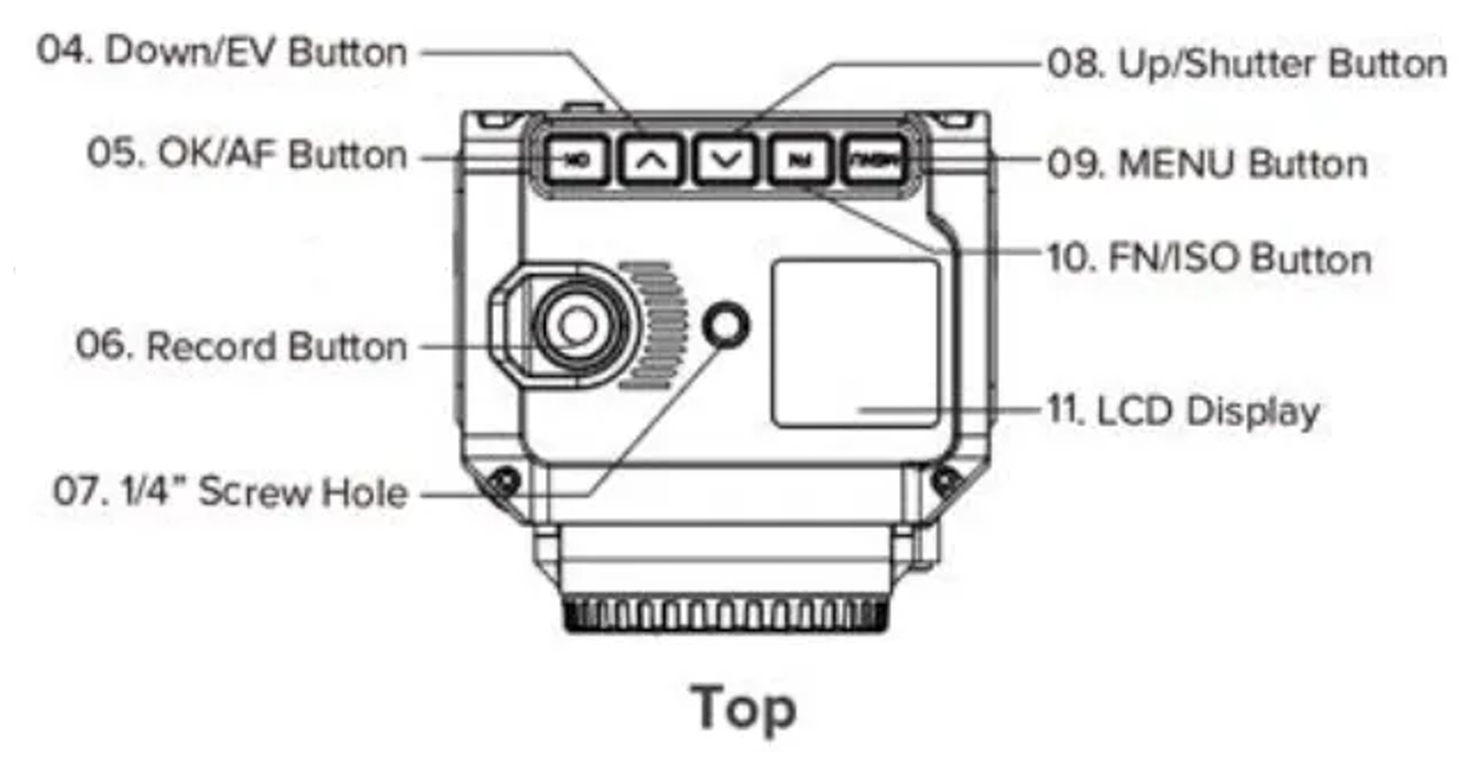
| 4. Down / EV Button reduce value in settings menus, EV quick setting in standby, preview, or record modes. |
4. LCD Display press FN + OK when the camera is in standby to turn on video preview |
| 5. OK / AF Button Confirmation in menu or trigger Auto Focus function (with supported AF lens) in standby, preview, or record modes |
5. FN / ISO Button FN function in camera settings, ISO quick setting in standby, preview, and record modes |
| 6. 🔴 Record Button Start and stop recording a video |
6. MENU Button Enter or exit the camera settings, or return to the previous menu while in camera settings |
| 7. 1/4″ Screw Hole for top mounting a monitor or securing a cage onto the camera |
7. Up / SHT Button Increases value in camera settings. Selects Shutter control when in standby, preview, and record modes |
| 8. Up / SHT Button Increases value in camera settings. Selects Shutter control when in standby, preview, and record modes |
8. 1/4″ Screw Hole for top mounting a monitor or securing a cage onto the camera |
| 9. MENU Button Enter or exit the camera settings, or return to the previous menu while in camera settings |
9. 🔴 Record Button Start and stop recording a video |
| 10. FN / ISO Button FN function in camera settings, ISO quick setting in standby, preview, and record modes |
10. OK / AF Button Confirmation in menu or trigger Auto Focus function (with supported AF lens) in standby, preview, or record modes. |
| 11. LCD Display press FN + OK when the camera is in standby to turn on video preview |
11. Down / EV Button reduce value in settings menus, EV quick setting in standby, preview, or record modes. |
 |
|
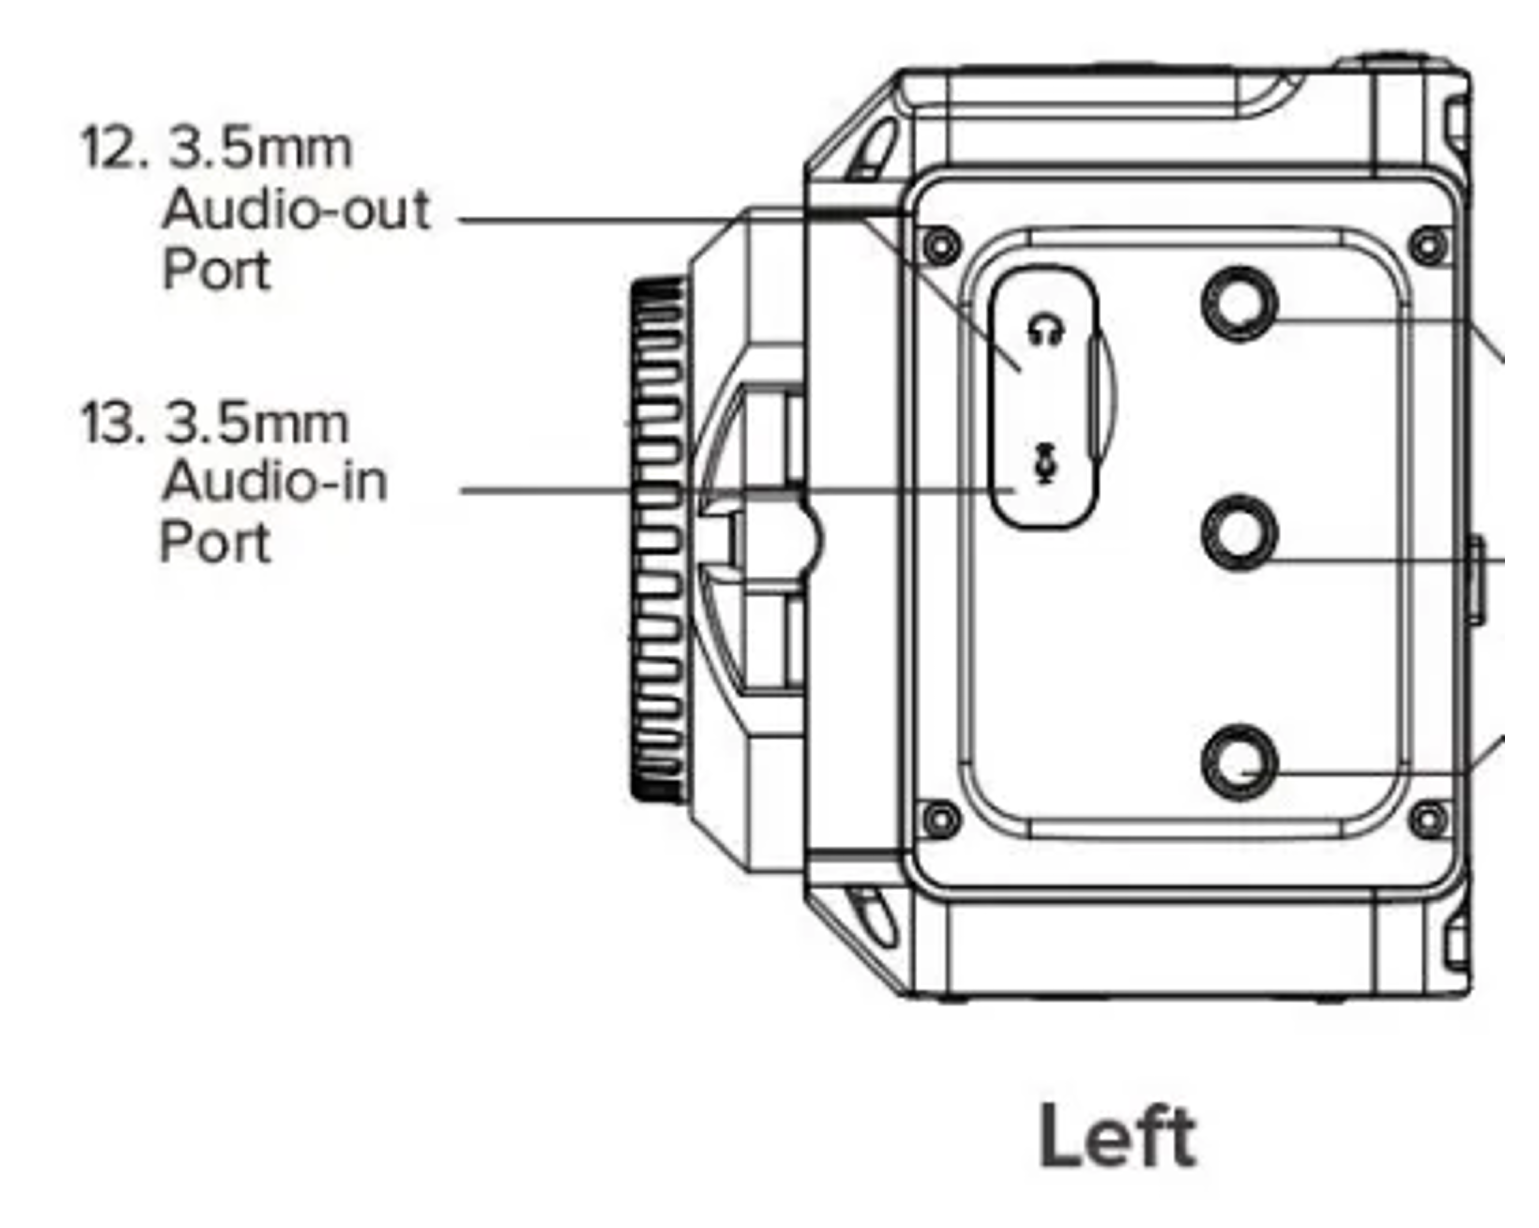
| 12. 3.5mm Audio Out 3.5mm TRS socket for stereo audio output |
12. 3.5mm Audio Out 3.5mm TRS socket for stereo audio output |
| 13. 3.5mm Audio In 3.5mm TRS socket for stereo audio input |
13. 3.5mm Audio In 3.5mm TRS socket for stereo audio input |
 |
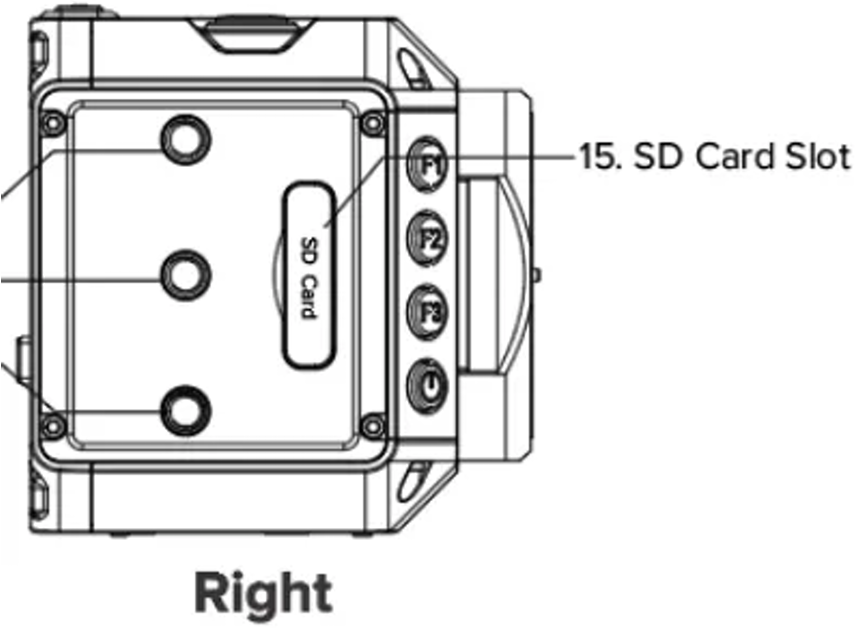 |
| 15. CFast card supports CFast 2.0 standard |
15. SDXC Class 10 SD card use UHS-I Speed Class 3 (U3) for 4K video recording |
 |
 |
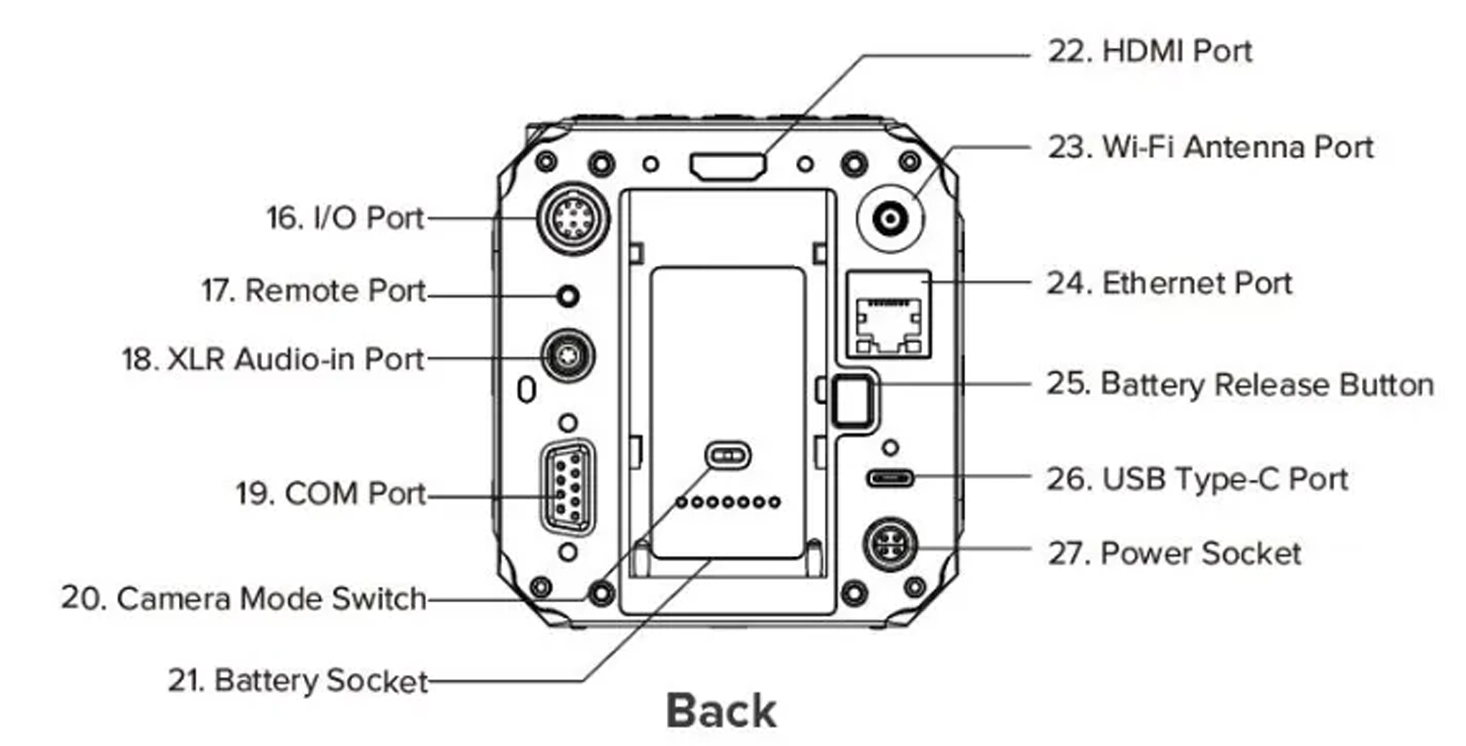
| 16. I/O Port 10- pin LEMO port for multi-cam sync with a cable like this. |
16. Ethernet Port gigabit Ethernet port for connecting to a computer or network switch for live control, streaming, and updates. PoE supported and 802.3af / 802.3at compatible |
| 17. Remote Port 2.5mm socket compatible with Sony LANC protocol |
17. Remote Port 2.5mm socket compatible with Sony LANC protocol |
| 18. XLR Audio In 5 Pin LEMO connector for dual XLR input. Cable options. |
18. Battery Socket compatible with Canon LP-E6 battery |
| 19. COM Port DB-9 connector with RS232 protocol |
19. HDMI Port HDMI 2.0 Type A |
| 20. Camera Mode Switch – M / I / S M is master mode where this camera dictates control to others. I is individual mode, which is default. S is secondary mode to receive camera controls from a Z Cam set to M mode. |
20. Wi-Fi Antenna Port connect a 2.4GHz Wi-Fi antenna. Supports 802.11 n standard |
| 21. Battery Socket NP-F mount with contacts pins for power output to accessories. Powerextra NP-f970 battery with DC and USB output is my favorite battery, but any stable and secure NP-F battery can work. Some users adapt this mount to V Lock with this adapter. |
21. USB C Port – For data transmission and camera control only |
| 22. HDMI Port HDMI 2.0 Type A, Max output: C4K 60fps, 10-bit 4:2:2 |
22. Battery Release Button releases Canon LP-E6 battery lock |
| 23. Wi-Fi Antenna Port connect a 2.4GHz Wi-Fi antenna. Supports 802.11 n standard |
23. Power Input 2 Pin LEMO connector that supplies 12V power to the camera. |
| 24. Ethernet Port gigabit Ethernet port for connecting to a computer or network switch for live control, streaming, and updates |
|
| 25. Battery Release Button releases np-f battery lock |
|
| 26. USB C Port USB 3.0 standard. It has 5 options in the menu for what it can do, for an explanation of its functions read this section. |
|
| 27. Power Input 4 Pin LEMO connector that supplies 12V power to the camera. |
MENU SYSTEM Explained
Record MENU
-
Resolution
set the recording resolution, for max resolution settings check here
-
Project FPS
set the FPS that your editing timeline will be in
-
File Format - MOV or MP4
Must be in MOV for ProRes
-
Split Duration – 1 / 5 / 10 / 15 / 20 / 30 / 60 minutes
Set the time that the camera will split the clip. To stitch together before editing use the Z Cam VideoConcatenator
Timecode SUBMENU
5.1 Time Code Source – internal or external

5.2 Time Code Value

    5.2.1 Reset – resets the time code to 0

    5.2.2 Manual Input – set the time code manually (hour:minute:second:frame)

    5.2.3 Current Time – Sets time code so sync with camera setting time

5.3 Count Up

    5.3.1 Rec Run – Counts the time code only when recording

    5.3.2 Free Run – Continues the time code even when not recording video

5.4 Time Code Mode

    5.4.1 DF – camera modifies the difference between recorded time and time code

    5.4.2 NDF – Records the time code without drop frame

5.5 HDMI Display
>turn on or off time code displayed on your monitor through HDMI-
Playback FR.
Select default (project) frame rate or variable frame rate (VFR) for playback & review in camera.
-
Meta Setup
Assign Camera ID (A through Z) and Reel name as a number 001-999
-
Pre Roll
Turn on or off a pre roll buffer to each clip, when on the camera will automatically save footage from 5 seconds before recording
-
Raw over HDMI
Turning this setting on will allow recording ProRes RAW with an Atomos Ninja V. This setting cannot be turned on unless the Resolution is set to 6k or 4k.
Video MENU
-
Variable Framerate
To film in a frame rate other than the project fps. Dependent on Resolution, project FPS and WDR settings.
-
Encoder – H.264 / H.265 / ProRes Proxy, LT, 422 & 422 HQ / ZRAW
Select the encoder used for your files. The encoder used for recording determines bit depth and color sampling, and a chart of those is below is also found in the official 0.98 Z-CAM E2 Flagship Series User Manual. ZRAW, while not true "RAW" like cDNG, could be fairly called H265+, as it is records at a higher bitrate than H265.
| Encoder | H.264 | H.265 | ProRes | ZRAW |
|---|---|---|---|---|
| Color Bit Depth | 8 Bit | 10 Bit | 10 Bit | 10 Bit |
| Color Sampling | 4:2:0 | 4:2:0 | 4:2:2 | N/A |
-
Bitrate – High, Medium or Low
Select the bit rate quality of recording while in H.265 codec.
-
Proxy Track
Turning this setting on enables a proxy track to be recorded simultaneously. Prior to firmware 0.94 these files were written to a separate folder, but due to playback issues, the proxy files are now encoded in the same file as your main recording and extracted with the Z Cam Video Transcoder. Proxy tracks are how I am able to edit 8k H.265 files from my F8 on a laptop, so I strongly recommend you learn Proxy workflow for you NLE of choice.
-
Rotation – normal or upside down.
Rotates the image by 180 degrees. A setting in stream converter in being developed for 90 rotation for smartphone streaming delivery.
-
WDR – only on E2 and M4
Enable wide dynamic range in select recording modes. When enaled the dynamic range is extended from 13 stops of Z-Log2 to 16, with 1.5 stop increases for highlights and shadows
-
Timelapse
select the time for a timelapse
-
VFR Control
Select how precise of control over the exact variable frame rate
-
Crop Sensor
For super-sampled resolutions turning this setting on will crop the sensor to the resolution set instead of supersampling. Two examples are on the F8’s 4K mode, where you can achieve a 4x sensor crop, or on the F6’s 4K mode, where you get similar to Super 35 coverage, if you’re using crop lenses.
-
Low Jello
Enable this mode to improve rolling shutter performance. User feedback puts improvement in performance by a factor of 2.
-
Photo Quality – JPEG, RAW, or HEIF
Audio MENU
-
Encoder – None, AAC, or PCM
-
Input – Microphone, XLR, Mic Left + XLR Right, or Mic Right + XLR Left
You can choose between 3.5mm, XLR, or a mix of R/L or L/R of the two. If Microphone is selected and nothing is plugged into the 3.5mm input, then the camera will use its on board microphones.
-
Input Gain – -18dB to 6dB
Adjust the recording levels of microphones. Can be mapped to a dial function on the RVLVR clutch handle. Also can be set to auto.
-
Encoder - None / AAC / PCM
Selecting none records audio uncompressed, AAC is my prefered audio compression encoder.
-
Output Gain – -6dB to 6dB
boost or lower the audio volume to your headset without impacting recording levels
-
Phantom Power
While the Z Cam has the ability to do phantom power for microphones, it is recommended that you use the microphone’s battery power for the cleanest audio. Must have an XLR input enabled to change this setting.
-
Audio Level Display
Enables the audio level to be shown on screen
Exposure MENU
-
Flicker Reduction – 60Hz or 50Hz
This setting is used to reduce light flickering caused by the frequency of electricy. Use 60Hz in Northa America, South Korea, Philippines, and Taiwan. Use 50Hz for mainland China and other countries.
-
EV – -3.0 through +3.0 with 0.3 increments
Sets the exposure value of the camera
-
Shutter Speed
Select the shutter speed of your camera or set to auto. Can be remapped to various handles for easier control. The minimum shutter speed is the 1/FPS setting. If your VFR is 1fps then you can set it to 1"
-
Aperture
Adjust the aperture of your lens. Only lenses with electronic contacts can communicate this value to the camera body, so it will not show a value when you have a manual aperture control lens on your camera.
-
ISO
Select the ISO of your camera. For native ISO settings on all models click here.
-
eND
Control stops of ND applied when you have an eND filter installed in compatible flagship lens mounts.
-
Min ISO
Set the lowest ISO value when your ISO is set to auto
-
Max ISO
Set the highest ISO value when your ISO is set to auto
-
Max Shutter Speed
Set the highest selectable shutter speed value
-
Metering Mode – Center / Average / Spot
Select the exposure metering mode. Center takes values from the center of the frame, Average takes a sum of all exposure in the frame, Spot only selects a region to take exposure values from.
-
Shutter Operation
Change between Speed and Angle measurements for your shutter.
-
ISO Control
Select either fine for precise control or Native ISO to lock all but the dual native ISO values to be selected
-
AE Speed – Slow / Normal / Fast
Auto Exposure speed adjusts how fast the camera will change the exposure when in auto exposure mode
-
Lock In Record
Turn off to be able to change exposure settings while recording a clip. Turn on if you are using any auto exposure settings to lock that exposure level when you hit record.
White Balance MENU
-
Mode – Auto, Incandescent, Cloudy, D10000, Fluorescent, Daylight, Shade, Manual, or eND (flagship only)
select the white balance setting, auto works very well with run and gun in changing environments in my experience.
-
Kelvin – 2300K ~ 7500K
-
Tint – 100 to – 100
-
Priority – Ambiance / White
Ambiance increases a warm cast color when shooting in a tungsten lit scene. White decreases a warm cast color when shooting in a tungsten lit scene. ALWAYS use white priority when shooting in Z-Log2
-
Lock in Record
Turn off to be able to change white balance settings while recording a clip. Turning this setting on will lock the WB range when you start recording while in any WB mode besides manual.
Focus MENU
-
Focus Mode – MF or AF
I always use MF and a follow focus when possible
-
Focus Area – Flexible Zone or Human Track
Human track works quite well for human subjects
-
Focus Area Size – Small / Medium / Large
Can only be changed when flexible zone focus area is enabled.
-
Change Focus Area
Allows the user to select which region of the screen will be used in Flexible Zone focus mode
-
Continuous AF
Enable to allow focus tracking to follow a moving subject
-
Live CAF
When on it will contiously focus in real time according to the scene. While not perfect AF performance, it is fairly good compared to any of the other cinema camera brands I've used.
-
CAF Sensitivity – High / Middle / Low
-
MF Assist – Enable or disable
This will temporarily zoom in with a 2x crop on the LCD screen and HDMI output. Note this is not focus peaking, that is found under the Assist Tools sub menu in System settings. Will not crop the recorded clip.
Image MENU
-
Image Profile – Rec. 709, Z-Log2, Flat, HLG
1.1 Rec. 709 – use this for direct output and quick turnaround times with no grading necessary in post.
1.2 Z-Log2 – Log developed by Z Cam with 13 stops of dynamic range and preserves detail in highlights, for grading in post.1.3 FLAT – Has the dynamic range of Z-Log 2 but with the Rec 709 profile baked into it.
1.4 HLG – Hybrid Log-Gamma – Encode the high light part of the logarithmic curve and the low light part of the standard gamma curve
-
Sharpness – Strong, Medium, or Weak
-
Noise Reduction – Medium, Weak, or Off
-
Brightness – 0 to 100 – set the recorded brightness of the image
-
Saturation – 0 to 100 – set the recorded saturation of the image
-
Contrast – 0 to 100 – set the recorded contrast of the image
-
Luminance Level – Full (0-255) or Limited (16-235)
I use limited for ease of editing
Connection MENU
Network SUBMENU
1.1 Wi-fi -  To Connect, turn your phone or tablet to airplane mode, search for a wifi network name similar to “ZCAM-E2-####” and connect with password 12345678

1.2 Wi-Fi IP – When Wi-Fi is enable this displays your camera’s IP4 address for manual connection

1.3 ETH. Mode – Router, Direct, or Static

1.4 ETH. IP – displays your camera’s ethernet IP4 address for manual connection
USB SUBMENU
2.1 Host – The camera will be a host device to transfer data to an external SSD or to have a wired connection for smartphone monitoring and control

2.2 Mass Storage – The camera will be recognized as an external drive when connected to a computer. Use this mode for fast offloading of CFast card footage without the need to remove the card.

2.3 Network – connect your camera to your computer with USB C for livestreaming control and monitoring. Can also control the camera through the HTTP API.

2.4 Serial – the camera will be controlled by UART command when connected to a computer through the USB port

2.5 PTP

2.6 USB Camera - To use your Z CAM as a webcam use this setting. Recommended use is connecting your camera to your computer with a USB C to USB A cable.
HDMI SUBMENU
3.1 Display Info – Enable for settings info to appear on screen, disable for a clean output image to a recorder

3.2 OSD Layout – Type 1 / Type 2 – Type 1 displays assist tools as waveform directly onto video. Type 2 Adds a black frame area to display assist tools

3.3 Format – HDMI output resolution, which differs from internal recording resolution.

3.4 Use EDID – toggles whether the camera automatically reads the EDID information of the HDMI connected monitor- UART – Controller, Pelco D, Multiplexer, or Linear TC.
Changing this setting requires a camera reboot to take effect. Controller uses UART command, Pelco D is for use with gimbals, multiplexer are supported by third party devices, and Linear TC allows timecode to be input to the camera
System Menu
-
Clear Settings
Resets all settings to default value. Requires a camera reboot to take effect.
-
Format Card
Formats the CFast card. Do this every time you insert a card for best results
-
Assist Tools
3.1 Display – Toggle assist tools on or off
3.2 Scope – display either Waveform, Parade, Vectorscope, or histogram on screen. Option to change overlay opacity and to measure with or without the LUT
3.3 Peak – enable in camera focus peaking, color options are red, green, blue, orange, or white. You can toggle monochrome on or off as well as adjust the focus peaking threshold (sensitivity).
3.4 Exposure – Toggle zebra stripes as well as set your Zebra1 and Zebra2 sensitivity value. I usually have Zebra1 set to 100 for complete overexposure blowouts and Zebra2 to 75 for skin tone exposure.
3.5 Frame Line – Can overlay grid lines in 2.4:1, 2.35:1, 1.9:1, 1.85:1, or 4:3 aspect ratios onscreen in red, green, blue, orange, or white.
3.6 Center Mark – toggle a center mark in red, green, blue, orange, or white.
3.7 Grid Line – Toggle grid lines on or off
3.8 Safe Area – toggle safe area on or off
-
Load LUT
To import a LUT, save a x33 cube format with a name under 16 letters containing no spaces into MISC/looks/preview/ of the CFast card. This LUT will be available in playback mode
-
Desqueeze Display
Apply a vertical or horizontal anamorphic desqueeze to the display options are 1x, 1.33x, 1.5x, 1.8x, and 2x.
-
User Profile
6.1 Save Profile – saves the current user settings to a profile in camera
6.2 Load Profile – Load a previous user profile from the camera
6.3 Save To Card – Saves the current user settings to a profile on the CFast card
6.4 Load From Card – Load a user profile from the CFast card
-
User Button – None, Take Photo, AE Lock, AF Lock, WB Lock, Aperture, ISO, Peak, Exposure Tool, Scope Tool, HDMI OSD, Shutter, EV, AF, Magnifier, Focus Area, Record, VFR, Enable LUT, and Playback.
assign 8 custom functions on an E2 and 9 on a flagship.
-
Record Indicator
Toggles a red LED indicating when the camera is recording
-
Restore Lens Pos.
When enabled the camera will remember the latest focusing position of the lens when the camera is turned off and on.
-
LCD Brightness
Increase or decrease in body LCD brightness
-
Power –
11.1 Auto Power Off - never, 30s, 1 min, 2 min, 4 min, 8 min, and 15 min.
11.2 Auto standby - never, 1 min, 5 min, and 15 min.
11.3 Low Alarm - This safety feature ensures that when your NP-F or V Mount batteries hit this level, the camera will stop recording and save the current clip.
11.4 Power Output - Turning this on allows you to power external accesories such as a monitor from the 2 pin Lemo port in the top left of the back of the camera.
-
Language
Change the language of your options menu
-
Date / Time
Set a custom date and time
-
Time Zone
Set your filming time zone
-
Camera Status
View your storage space brand, usage, current camera temperature, version number, and serial number
-
Version
Check the current firmware version number installed on your camera
Z CAM Software In Depth Guides
Z CAM VideoConcatenator
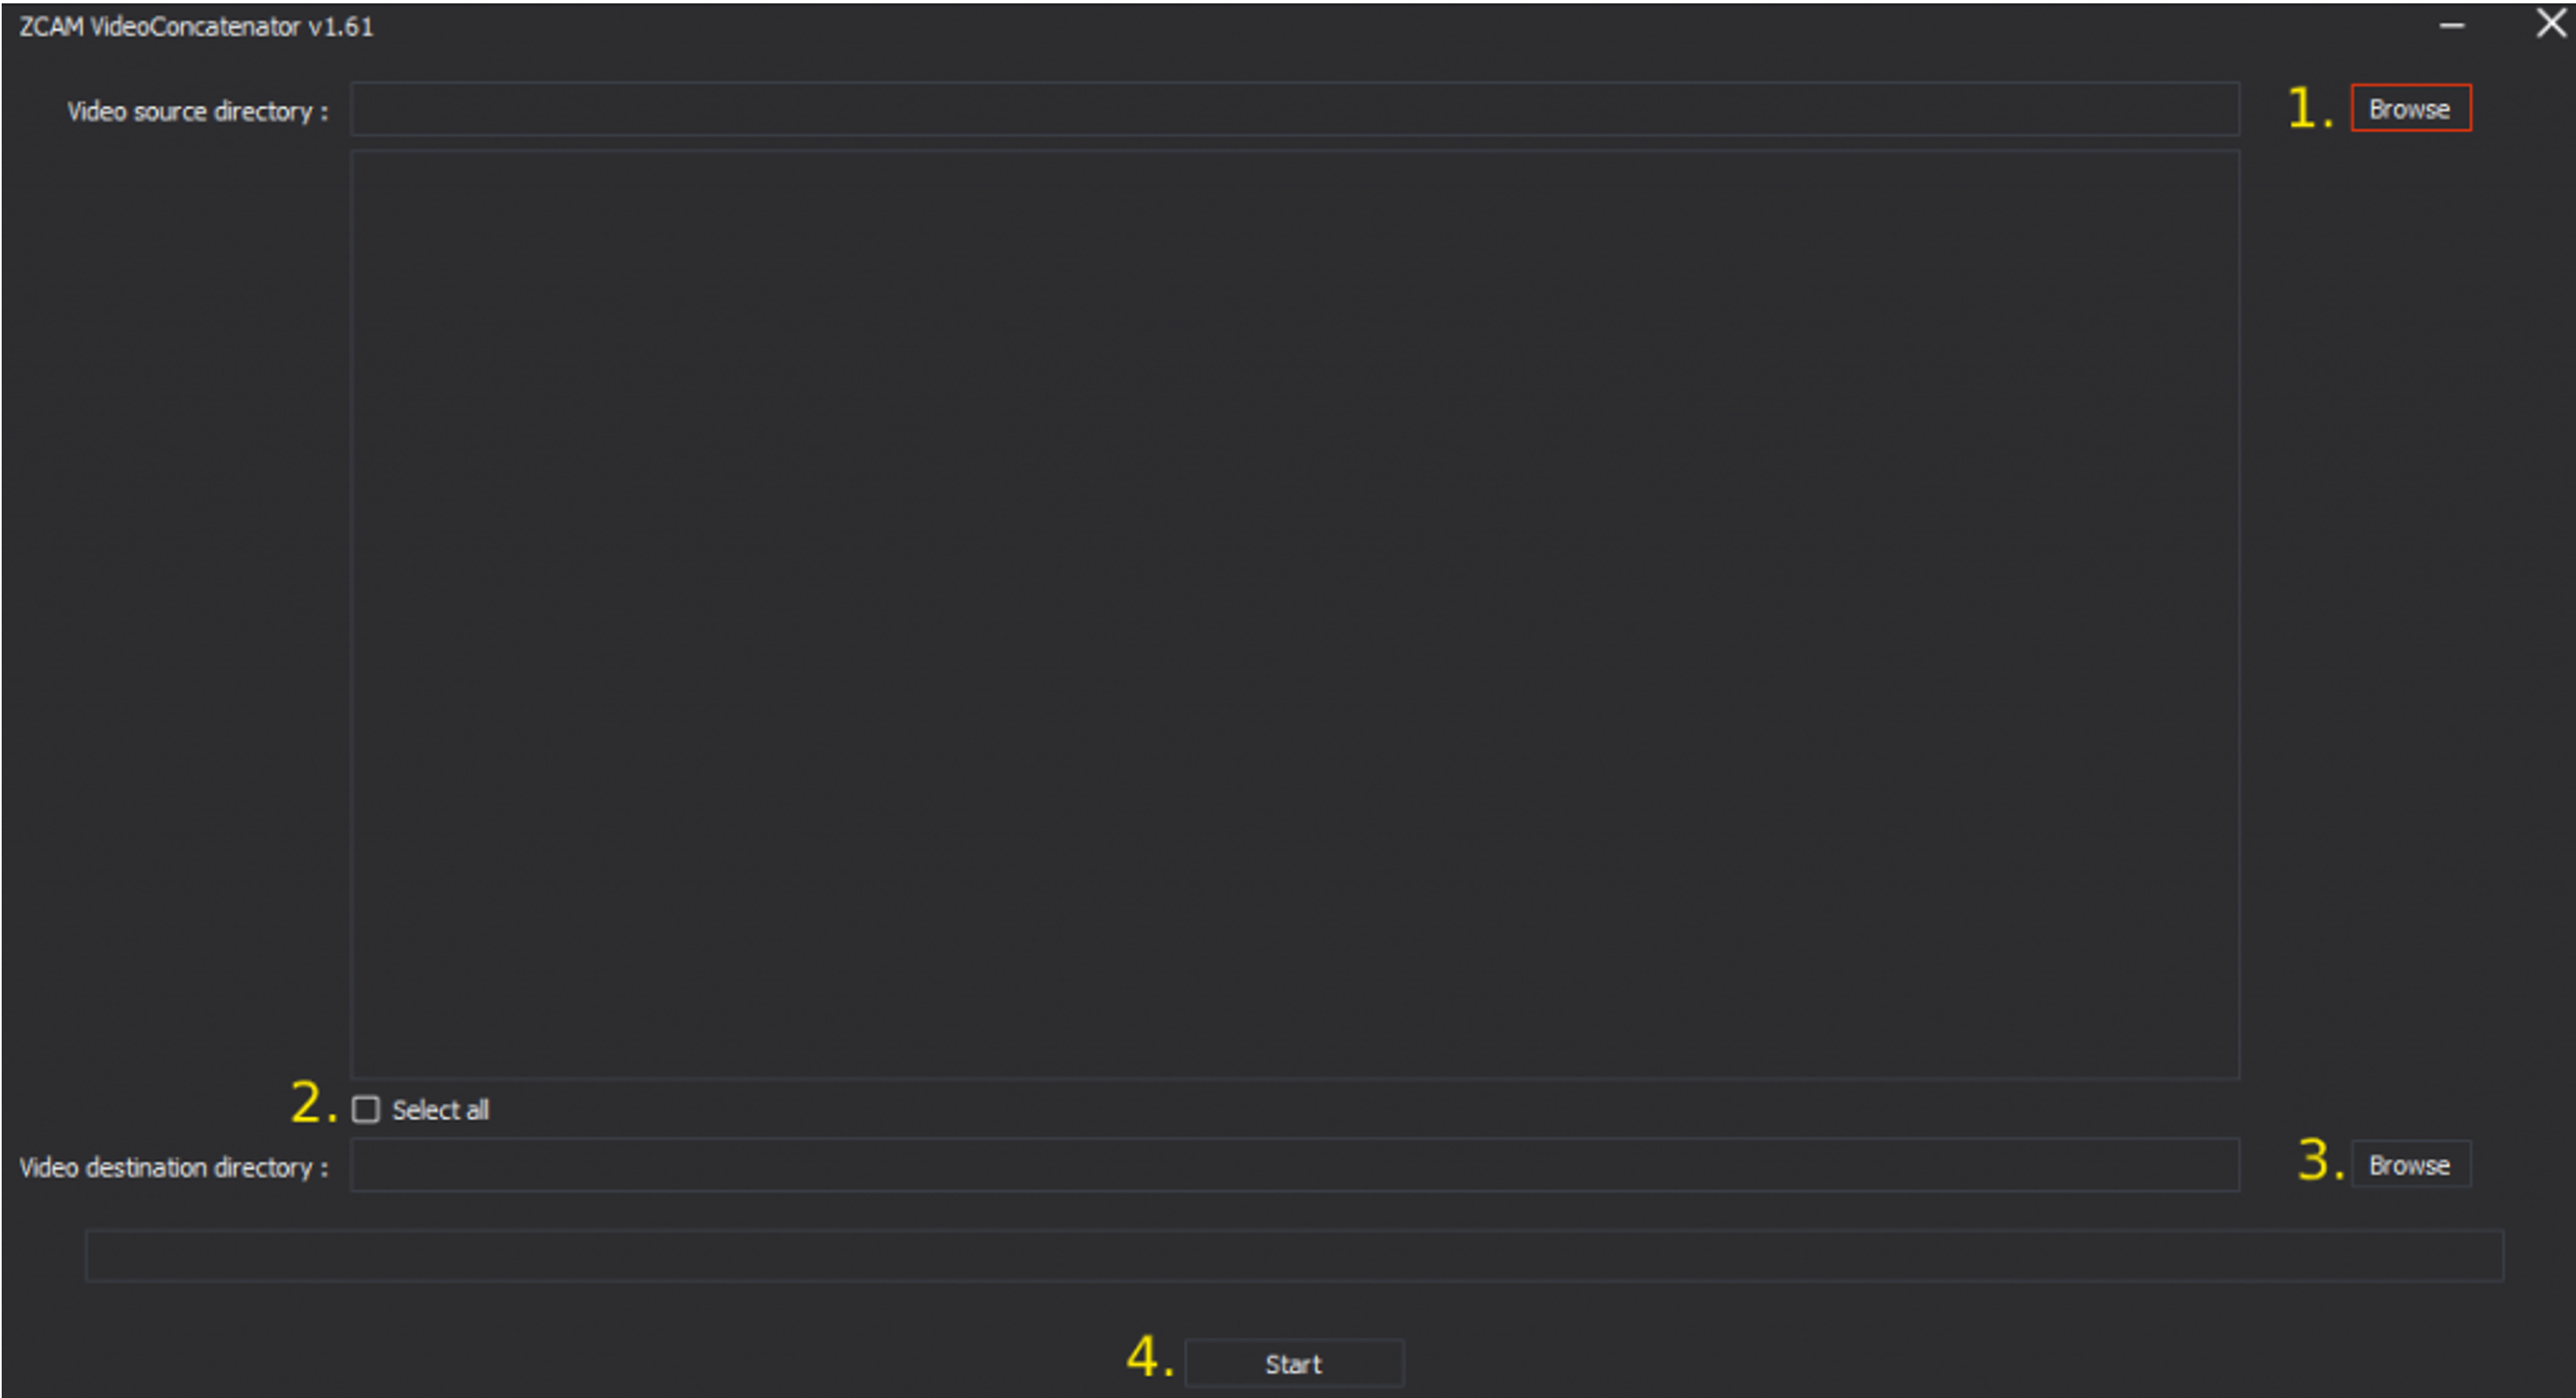
This application is used to link files that are split due to the Record MENU → Split Duration Setting. If you record long interviews and want to avoid use of this app, simply set your Split Duration setting to 60 minutes.
Click on your computer's operating system to download the software
-
Click Browse and navigate to the folder that contains the files you desire to link together into one clip.
Once selected the Video Source Directory should display the file path of your footage and the box below should populate with all media in that folder
-
Select the check boxes next to the clips you wish to link together
Click Select all if you wish to link all the split clips of that folder together
-
Click Browse to the right of Video Destination Directory
This MUST be a different file path than your source directory, however it can be a folder within that directory. Once selected, the Video Destination Directory should display the file path of where you are saving the new, linked clips.
-
Click Start
Z Cam VideoTranscoder
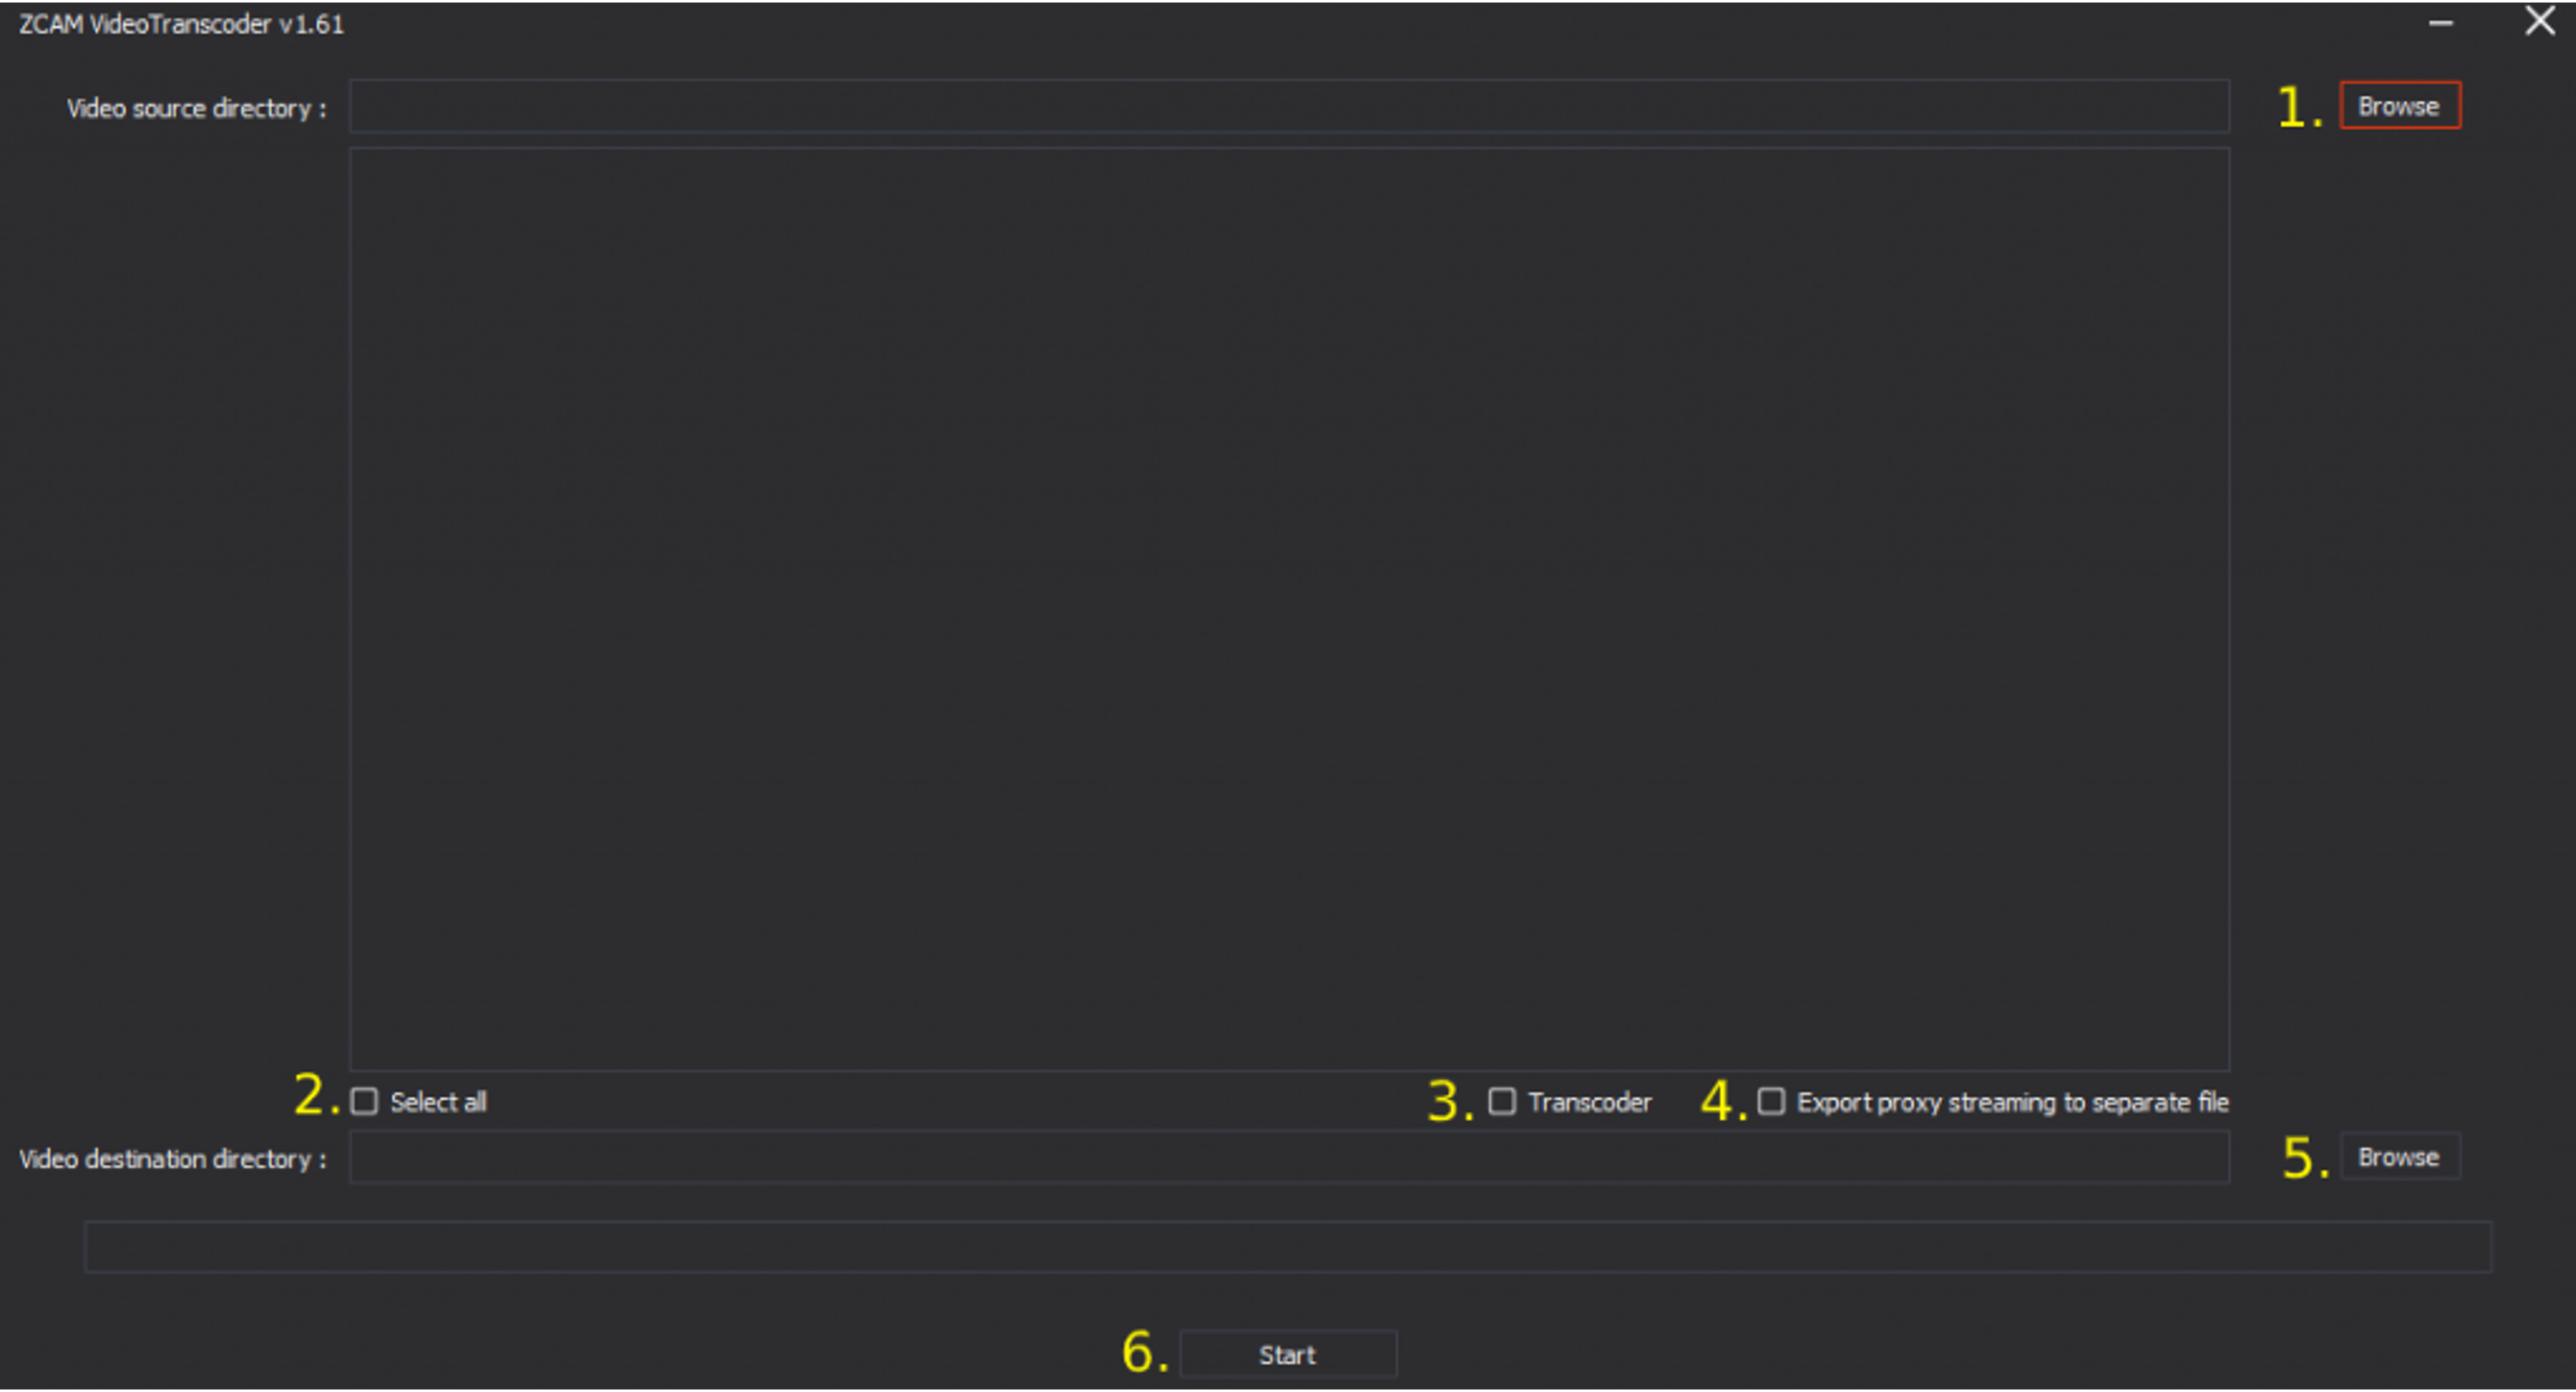
This application is used for extracting the Proxy track (when enabled in camera settings!) and transcoding footage, such as H265, into codecs that are easier on NLEs.
Click on your computer's operating system to download the software
-
Click Browse and navigate to the folder that contains the files you desire to link together into one clip.
Once selected the Video Source Directory should display the file path of your footage and the box below should populate with all media in that folder
-
Select the check boxes next to the clips you wish to extract proxies from or transcode
Click Select all if you wish to link all the split clips of that folder together
-
Check Transcode if you desire to transcode footage into a more NLE friendly codec
Note, checking this option will dramatically increase the time for your batch to finish.
-
Check Export proxy to separate file if you desire to extract proxies to sync with your NLE
Note, just having this option check will have a very short batch run time
-
Click Browse to the right of Video Destination Directory
This MUST be a different file path than your source directory, however it can be a folder within that directory. Once selected, the Video Destination Directory should display the file path of where you are saving the new, linked clips.
-
Click Start
ZRAW Video Suite
Z RAW Premiere Plugin
Z Cam Color Correction Plugin
An In-depth video explanation of this plugin was made by Hayden Goldsworthy, who also makes an excellent pack of camera agnostic Rec 709 LUTs. Here are the basic steps for the Z Cam color correction plugin
- Drag plugin effect onto your clip
- Select your color input space
- Make primary corrections with this effect
- Apply creative LUTs like Hayden's and fine tune your adjustments
Z Cam Stream Converter
Z Cam Controller (Web Browser)
My preferred way to connect my Z Cam to my computer is with a USB C cable and connecting to the web browser, since it requires no installs and gives you the same basic features as the desktop application. Connect to 172.18.18.1/www/index.html in your browser. Be sure your USB mode is set to Network in the Connection Menu in camera. On the webpage you can control the camera or playback. You can find the latest Z Cam E2 firmware here for download, and to update your camera, go into the Misc Menu, click Upgrade and then select the file you downloaded from Z Cam's website in the prompt.
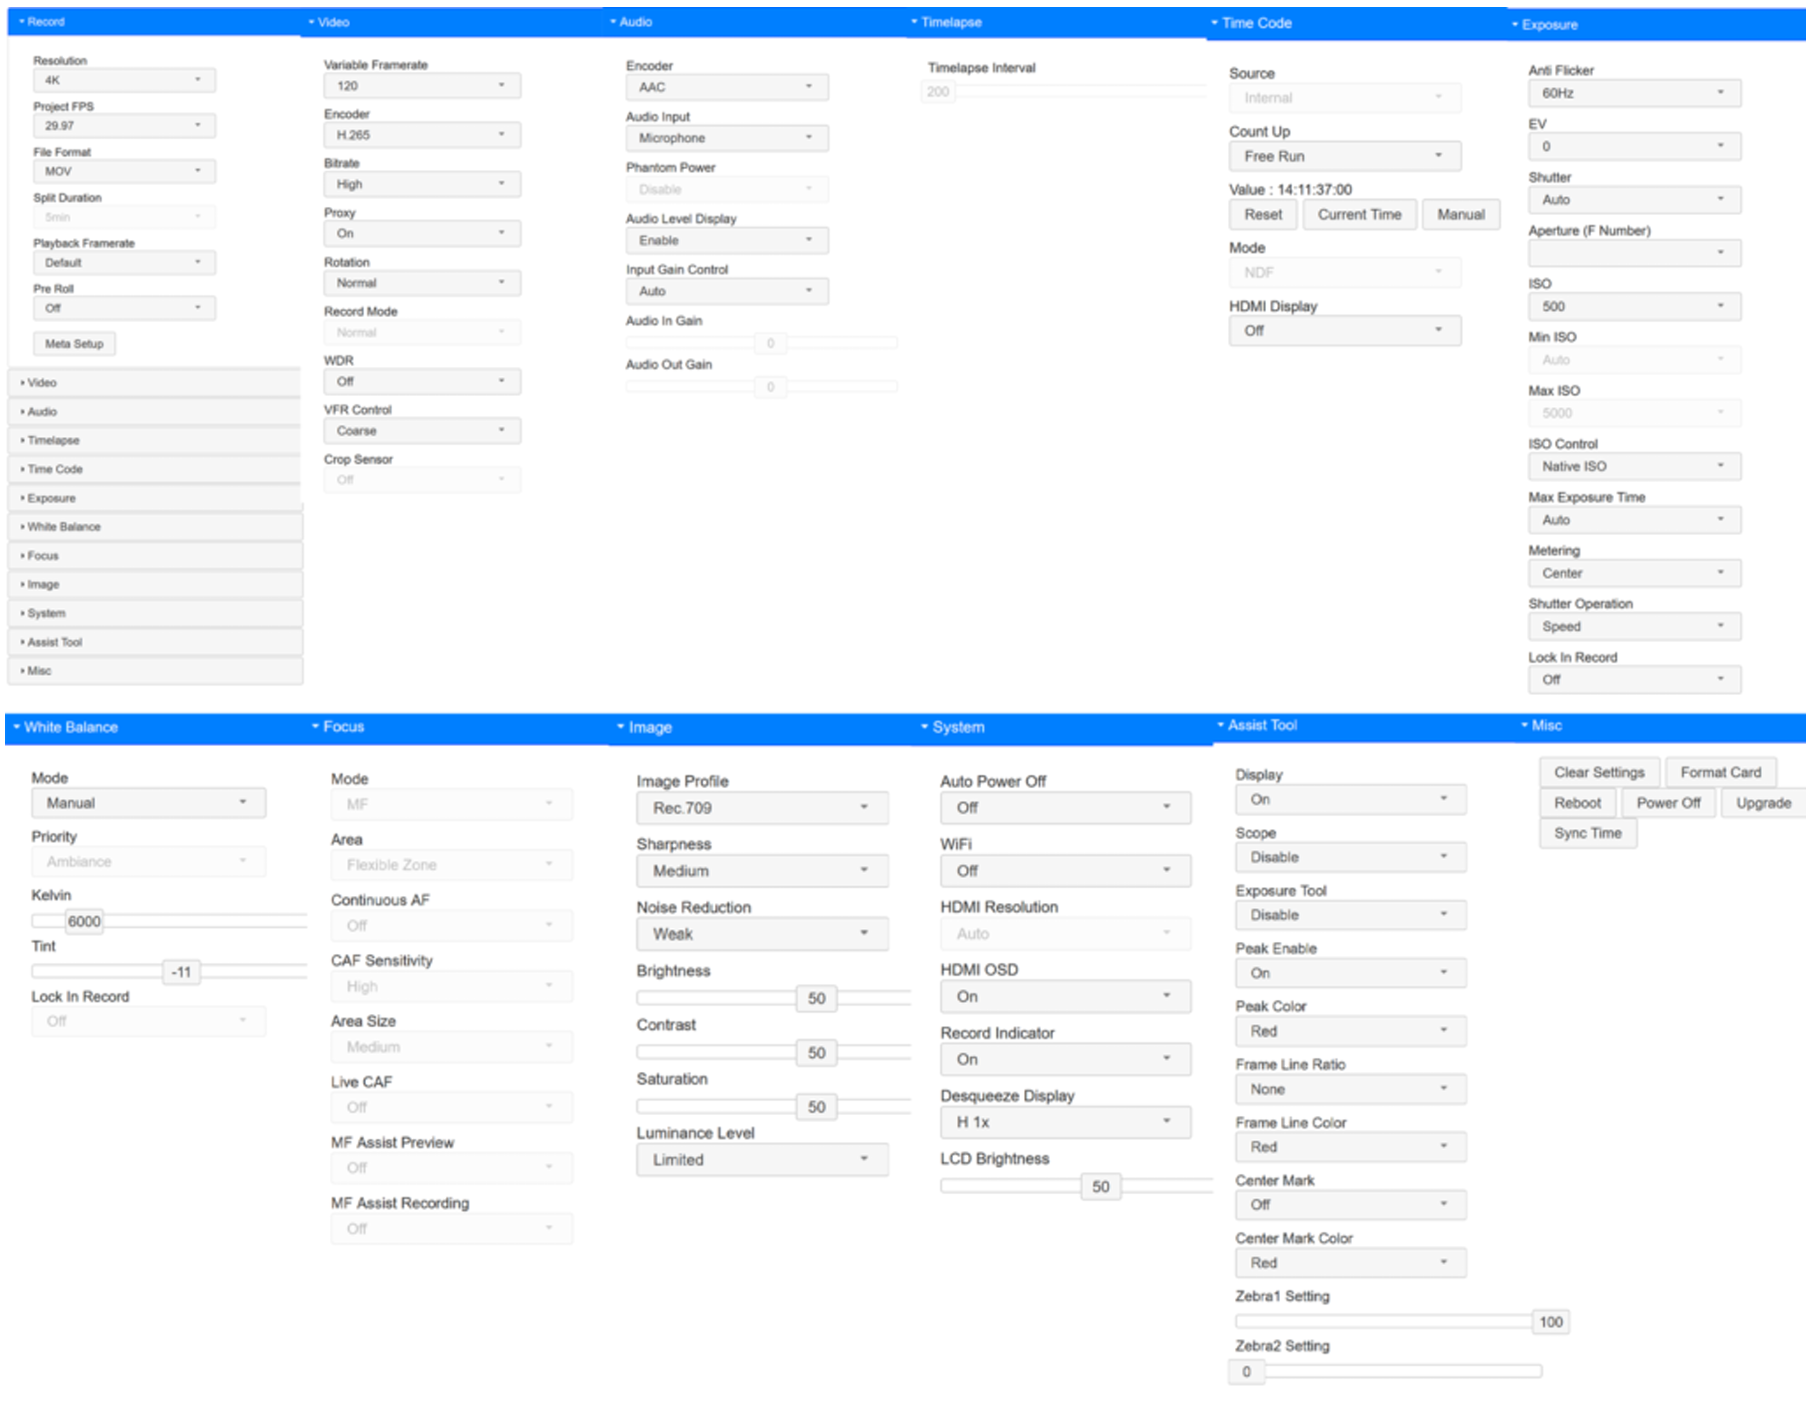
Z Cam Web Browser Controller All Menu Settings
Guides and Tutorials for Z Cam
How to Connect Z Cams for Livestreaming
Before we get into how to setup the Z Cam for livestreaming I’m first going to give some basic explanations of networking to help first time users.
DHCP – Dynamic Host Configuration Protocol – in simple terms this is a networking configuration feature that allows an item connected to a network to assign an IP address that can occasionally change to other devices. Z Cams have DHCP enabled when turned to Direct Ethernet mode, so it can assign IP addresses to other devices, such as more Z Cams that are in Router mode. Router mode allows Z Cams to receive a DHCP assignment from another device on the network. My home network already has DHCP, so when I connect my Z Cams to my PoE switch I turn them to Router mode to be able to access their web controller portal from any device connected to my home network.
PoE – Power over Ethernet – this allows you to deliver power through an Ethernet cable. Note that only the Z Cam E2C natively supports PoE so for the other models you will have to get a PoE splitter and either the DC power cable for the E2 or the Flagships, but this is definitely a feature that is worth using.
Switch – A piece of network equipment that can be thought of as a hub for Ethernet devices. They come in two varieties managed, a highly configurable switch that is usually at the core of networks, and unmanaged which is a plug and play hub. For our uses we need an unmanaged switch, such as this 5 port option from TP Link or this 5 port PoE option from YuanLey. Neither of these have DHCP built in, which means they won’t try to overwrite IP settings that either your network will assign it or the one from the host Z Cam in a Direct – Router multi-cam setup.
Z Cam USB C Networking Tutorial
USB C Connection with Z Cam Flagship
This is the simplest networking connection method because it will always assign your Z Cam to the IP 172.18.18.1 which makes this my preferred method for single camera connection or for diagnosing a troublesome camera in a multi camera configuration. A limitation to this method is that since the USB C Network IP cannot be change this only works for one camera. All you need for this method is a USB C cable to connect to your computer. In camera navigate to the Connect menu and enter the USB option and change it to networking, now plug in the cable to the computer. Now you are able to access the Z Cam Web Controller at 172.18.18.1/www/index.html in your web browser. In the Z Cam Controller desktop app you can go to add camera and direct it to 172.18.18.1 or with the OBS SSP plugin at the same IP.
Z Cam Direct Ethernet Networking Mode Tutorial
Direct Ethernet Networking Connection with Z Cam Flagship
This section will focus on connecting a single camera through Ethernet to a computer, although if that’s all you’re after I would recommend using USB C, but after the Routing section, I’ll go into detail of how the two modes can be used in tandem for a Z Cam DHCP assigned multi-cam network. To utilize this mode you will connect your camera’s Ethernet to a PCI Ethernet port, USB to Ethernet adapter, or a spare Ethernet port if your desktop or laptop has one available. Ethernet Cat 5 and above is recommended so I use these flat Cat 6 cables. In your camera change your USB setting to something other than network, then in the network settings switch to Direct mode. Now plug in your camera to the computer and wait a few moments for your DHCP to configure the IP assignment. Enter the network settings in camera again and you should be able to view an IP address, mine when I connected this way was 10.98.32.1 but yours maybe different so verify in camera. When I connect a Z Cam to my laptop through the USB to Ethernet adapter the Scan Camera feature works on the desktop Z Cam Controller, your mileage may vary. Since the 10 network is a local access only network you will not be able to access the cameras from another devices connected to your internet network.
Z Cam Routing Ethernet Networking Mode Tutorial
Router Ethernet Networking Connection with Z Cam Flagship
If your network already has a DHCP running on it then this mode will allow your Z Cam to receive an IP assignment from another device instead of generating its own. Turn your camera to Routing Ethernet mode in the connection setting then connect it to your switch. After a few moments your DHCP will assign the camera an IP address which you can view in the network connection menu. When I connected this way to my home network the IP for my F8 & E2 were 192.168.1.23 and 192.168.1.25 but yours maybe different so verify in your camera menu. The auto scan feature on the Z Cam Controller desktop application didn’t auto discover either camera with this method, but when I added the IP addresses manually it works as expected. Using this method allows you to connect to the camera’s web control portal from any other device on the network.
Z Cam Direct – Routing Hybrid Networking Setup Tutorial
This is a complex networking setup that you need to be familiar with both the direct and routing modes and how they work independently before putting them together. From what I can come up with this setup is helpful in 2 situations, the first being if your network doesn’t have a DHCP and the second being if you are shooting in a remote environment that does not have an internet connection. I had to figure out this setup to prepare for a JRE style podcast where I won’t have access to the internet connection on site, but I still wanted high fidelity recordings in camera and a live switched local recording of the show on my laptop. Here are the steps that I got this method tested & working.
Turn your main camera to Direct mode in network connection menu. Connect it to your Ethernet switch in the first port with no other devices plugged in. Wait a few moments and it will assign itself an IP as normal in Direct mode, once the IP displays
Turn your second camera to Router mode in network connection and plug it in to the second port on your Ethernet switch. Wait a few moments and it will receive an IP assignment from your main camera.
Repeat step 2 for up to 13 Z Cams in Router mode (10.98.32.X network limitation)
Once all cameras are connected and have their IP assignments plug in an Ethernet cable to the uplink port of your switch, if it’s not labeled you can usually see one port is separated from the others, like port 5 on this TP link model.
Now connect that Ethernet cable to your computer, if you aren’t connected to another Ethernet network I would recommend using your motherboard’s native Ethernet port if it has one.
Input all the IPs manually into your program of choice, when I used this method my main camera was 10.98.32.1 and 10.98.32.12 for my second camera, but again yours might be different, so make note of the IPs when you connect your cameras in steps 1-3
A limitation of this method is that the cameras will not be able to be accessed by another computer on the internet network if you are connected to one.
Z Cam Static IP Networking and How to Assign a Static IP
My instructions were written on 1.0.2 and from firmware 1.0.3 you need to add &dns=192.168.1.1 as a suffix to each command.
Make sure when assigning Static IP’s to multiple Z Cams, to use a different final number in the Static IP assignment for each camera.
With your Z Cam attached to your computer with any ethernet connection method above open your browser
Enter this code into your browser, with XX’s being your current IP and YYY’s being the IP you are assigning it to
XX.XX.XX.XX/ctrl/network?action=set&mode=static&ipaddr=192.168.1.YYY&netmask=255.255.255.0&gateway=192.168.1.1
To change my camera from Direct mode on 10.98.32.1 to static mode on 192.168.1.100 I used this code
10.98.32.1/ctrl/network?action=set&mode=static&ipaddr=192.168.1.100&netmask=255.255.255.0&gateway=192.168.1.1
To change my camera from Router mode on 192.168.1.23 to static mode on 192.168.1.100 I used this code
192.168.1.23/ctrl/network?action=set&mode=static&ipaddr=192.168.1.100&netmask=255.255.255.0&gateway=192.168.1.1
To change my camera in static mode on 192.168.1.100 to a new IP (192.168.1.108) in static mode I used this code
192.168.1.100/ctrl/network?action=set&mode=static&ipaddr=192.168.1.108&netmask=255.255.255.0&gateway=192.168.1.1
Wait about a minute and then test to see if the change took place by entering the web controller for your new IP, in my case it was 192.168.1.100/www/index.htmlRecommended Accessories for Z CAM and Setup Guides
Atomos Ninja V and Use With Z CAM
The Atomos Ninja V is a 5" monitor and recorder and what makes it stand apart from other monitors is that it is capable of ProRes RAW capture with Z CAMs. The Ninja V User Manual covers most general topics for the accessory, but here is how to set up the Ninja V with your Z CAM.
Z CAM Settings for ProRes RAW
- Be sure your Z Cam Firmware is 0.96 or newer.
- If you want to use your Ninja V to its full potential as a recorder then navigate to the Record MENU → Raw over HDMI setting and turn it on.
This setting may appear greyed out on your Z CAM, if this is the case change your camera's Resolution to either 6k or 4k, depending on desired ProRes RAW recording resolution.
Also note that enabling Raw over HDMI disables several other settings on Z CAM, only have it on when intending to record ProRes RAW.
Ninja V Settings for ProRes RAW
-
Be sure your Atomos Ninja V Firmware is 10.5 or newer
In order to update Ninja V Firmware, Download the latest firmware from Atomos, extract the ATOMNJV.FW from the firmware zip file, copy the .FW file onto the root directory of an SSD in a Master Caddy, insert the SSD to your Ninja V while powered off, then power up the Ninja V and the firmware will start to upgrade.
-
Activate ProRes RAW license, if needed.
This process is now different than when I needed to and first wrote this handbook, but the most up to date process I could find was here. And here is a guide for feature and codec activation
-
In the Input Menu on your Atomos Ninja V change HDMI Standard from 2.0 to Z-Cam.
-
Under the Ninja V Record Menu, make sure you are in ProRes RAW Codec, which will let you select ProRes RAW or PRR HQ compression.
-
If you want to acquire time-code information from your camera body then make sure HDMI is the source under the Ninja V Timecode Menu.
If you are a interested in getting the best performance from ProRes RAW in Davinci Resolve, then check out Sidney Baker-Green's playlist.
RVLVR Clutch Handle and Customizing the Functions
Download the latest RVLVR Clutch firmware here. They have detailed instruction on how to update so I'm not going to repeat them, instead enjoy a 1st time user guide made by the creator
Timecode Setup for Zoom F6
First, you need to have both apps (F6 control and Z Camera) on your iPhone.
Connect to your Z Cam and open the app. Go to Control, then Settings. Timecode and make sure you see the following values:
Time Code Source: Internal
Count Up: Free Run
Click on Time Code Value and select Current Time
Now, open a new Safari tab and navigate to http://10.98.33.1. Click on Controller. From the menu on the right, select Misc and then Sync Time. I have to sync the time using the web browser or it will be always wrong due to a weird timezone setting on the mobile app. I don't trust the mobile app for this.
Now, make sure your Time Code is being shown on the HDMI output. It should be your current time up to the second and milliseconds.
Now let's move to the F6. Open the menu on the unit, select TIMECODE. Make sure you have the following params:
Within Mode:
- Mode: Int RTC Run
- TC Out: Always
FPS: up to your camera project settings
Within Start TC: - Mode: RTC
Now, connect your app to your recorder. Open the Menu and select SET DATE/TIME. Your Timecode value on your recorder should be your current time up to the second and milliseconds.
If you did this right, the TC will be the same on both the recorder and the camera. Next time all you have to do is update the time on both devices, for the camera with the Web Interface and for the recorder with the F6 Control app. Do this at the start of every day. It should survive few hours without power if any of those loose power or their battery drains, but if that happens check on both screens if the TC is different, then just update their times again and will be in sync.
More Resources
YouTube Videos
Some of the helpful videos I've come across since writing my first version of the handbook.